Tipup Canopy Skin Fitting Questions

A forum in which to discuss topics that are not specific to a particular series of aircraft (ie. how to cut alclad)
Post Reply
User avatar
Brantel
Class B
Posts: 1029
Joined: Wed Aug 30, 2006 3:23 pm
Location: Newport, TN

Tipup Canopy Skin Fitting Questions

Post by Brantel »

I need to continue the quest to get a nice fit on the tipup canopy skin and have a few problem areas and need to know what you guys have done with these areas. Please offer your thoughts on the best way to deal with these spots:

Image

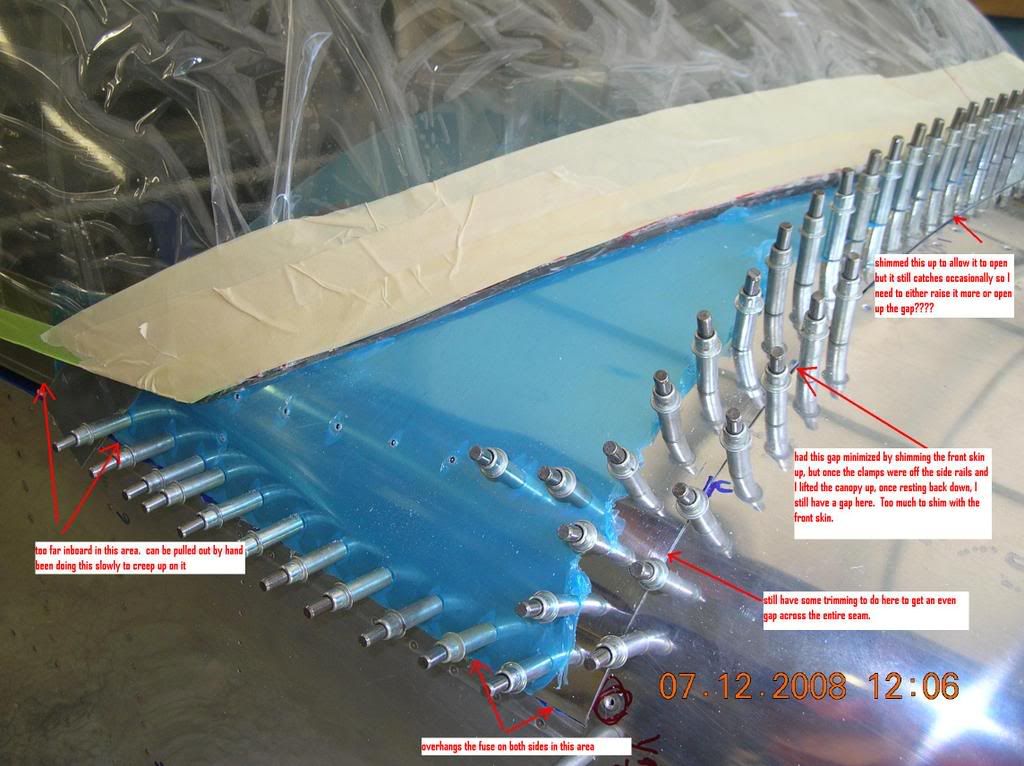
I took seaming pliers to the front lower corners and bent the edge in toward the fuse on the last 1/4" or so at the bottom. You can see that in the pic. Even with this, there is still an gap and you can see right thru there from the inside.
Brantel (Brian Chesteen),
RV12-IS, #121606, N912BC - Building Now!
RV10, #41942, N????? - Project Sold
RV-7/TU, #72823, N159SB - SOLD

User avatar
cjensen
Whiskey Victor
Posts: 5275
Joined: Sat Apr 23, 2005 10:36 pm
Location: Green Bay, WI

Post by cjensen »

I may be wrong...but, I wouldn't worry about getting all of it to fit perfectly at this point. Do you have the struts in yet? That will change things again...

I haven't even tried to fit the forward skin to the canopy frame yet. I had the skin on a time or two to check it, but getting it to fit will come later on.

As far as the bottom of the frame where it meets the fuselage, I used seamers from front to back to pull the skin and skirt out a bit.

YMMV...but I'm not worrying about it right now. Perhaps I should??? :?
Chad Jensen
Missing my RV-7...
Vertical Power support
920.216.3699
http://verticalpower.com

User avatar
bullojm1
Chief Rivet Banger
Posts: 1360
Joined: Sat Mar 25, 2006 6:37 pm
Location: KDMW
Contact:

Post by bullojm1 »

I took care of the gaps on the forward edge of the canopy skin with a metal shrinker. Worked PERFECTLY.

Image
Mike Bullock
http://www.rvplane.com
RV-7 | Superior IO-360 | Whirlwind 200RV
Garmin GTN650 | GRT Dual Sport SX EFIS
Status: FLYING!

User avatar
Brantel
Class B
Posts: 1029
Joined: Wed Aug 30, 2006 3:23 pm
Location: Newport, TN

Post by Brantel »

Hey Mike,

Mail that thing to me so I can use it! :mrgreen:
Brantel (Brian Chesteen),
RV12-IS, #121606, N912BC - Building Now!
RV10, #41942, N????? - Project Sold
RV-7/TU, #72823, N159SB - SOLD

User avatar
Brantel
Class B
Posts: 1029
Joined: Wed Aug 30, 2006 3:23 pm
Location: Newport, TN

Post by Brantel »

Not worrying to much with it because I have tons more I can do before getting to the fine fitting but I just wanted to see what others have done to fix some of these areas.

I did see on your site where you pulled the two front lower sides in with a coulple 2x4s and a strap. did that work OK to eliminate the gap at the front lower corners?

I will keep pulling on the side rail to canopy frame weldment areas to get them worked out to the fuse sides. My canopy side rails matched the fuse curve almost 100% out of the box but the canopy frame weldment is pulling them inboard at that splice plate area.
cjensen wrote:I may be wrong...but, I wouldn't worry about getting all of it to fit perfectly at this point. Do you have the struts in yet? That will change things again...

I haven't even tried to fit the forward skin to the canopy frame yet. I had the skin on a time or two to check it, but getting it to fit will come later on.

As far as the bottom of the frame where it meets the fuselage, I used seamers from front to back to pull the skin and skirt out a bit.

YMMV...but I'm not worrying about it right now. Perhaps I should??? :?
Brantel (Brian Chesteen),
RV12-IS, #121606, N912BC - Building Now!
RV10, #41942, N????? - Project Sold
RV-7/TU, #72823, N159SB - SOLD

Spike
Chief Rivet Banger
Posts: 4013
Joined: Thu Oct 14, 2004 8:40 pm
Location: Baltimore, MD
Contact:

Post by Spike »

One thing to mention here regarding gaps like this, remember to not get them too tight. When you paint you will definitely add a few mils to the thickness of the material.

Spike
http://www.rivetbangers.com - Now integrating web and mail!
Current Build: 2 years into a beautiful little girl

User avatar
bullojm1
Chief Rivet Banger
Posts: 1360
Joined: Sat Mar 25, 2006 6:37 pm
Location: KDMW
Contact:

Post by bullojm1 »

Also, dont worry about the front corners and how they don't line up. They will be pulled WAY in when you rivet it together.
Mike Bullock
http://www.rvplane.com
RV-7 | Superior IO-360 | Whirlwind 200RV
Garmin GTN650 | GRT Dual Sport SX EFIS
Status: FLYING!

User avatar
bullojm1
Chief Rivet Banger
Posts: 1360
Joined: Sat Mar 25, 2006 6:37 pm
Location: KDMW
Contact:

Post by bullojm1 »

Brantel wrote: Mail that thing to me so I can use it! :mrgreen:
I wish I could! I ended up borrowing it from a local -7 builder who bought it for the same reason! Those suckers are EXPENSIVE! Maybe you could find a place that rents them?
Mike Bullock
http://www.rvplane.com
RV-7 | Superior IO-360 | Whirlwind 200RV
Garmin GTN650 | GRT Dual Sport SX EFIS
Status: FLYING!

User avatar
cjensen
Whiskey Victor
Posts: 5275
Joined: Sat Apr 23, 2005 10:36 pm
Location: Green Bay, WI

Post by cjensen »

Brantel wrote:I did see on your site where you pulled the two front lower sides in with a coulple 2x4s and a strap. did that work OK to eliminate the gap at the front lower corners?
This did work great! I pulled it in about a half inch past the fuselage sides, and it sprung back just enough to line up.
Chad Jensen
Missing my RV-7...
Vertical Power support
920.216.3699
http://verticalpower.com

Post Reply