McMaster Carr Drill Bushing
-
Womack2005

- Class D
- Posts: 486
- Joined: Mon Oct 17, 2005 1:20 pm
- Location: Appleton, WI
McMaster Carr Drill Bushing
Does anyone have the part number of the tool needed to drill the Elevator horns? Thanks.
Will
7A 72452 Wings
\_____@(")@_____/
7A 72452 Wings
\_____@(")@_____/
-
Womack2005
- Class D
- Posts: 486
- Joined: Mon Oct 17, 2005 1:20 pm
- Location: Appleton, WI
-
captain_john

- Sparky
- Posts: 5880
- Joined: Sun Oct 31, 2004 9:17 am
- Location: KPYM
-
Wicked Stick

- Class B
- Posts: 1000
- Joined: Wed Feb 09, 2005 10:00 pm
- Location: KEWB
-
Spike
- Chief Rivet Banger
- Posts: 4013
- Joined: Thu Oct 14, 2004 8:40 pm
- Location: Baltimore, MD
- Contact:
In your drill press? Hmm, not sure I get it. Are you saying that you held the entire assembly vertical and somehow managed to get the press lined up correctly to do that?
http://www.rivetbangers.com - Now integrating web and mail!
Current Build: 2 years into a beautiful little girl
Current Build: 2 years into a beautiful little girl
-
captain_john
- Sparky
- Posts: 5880
- Joined: Sun Oct 31, 2004 9:17 am
- Location: KPYM
Nope, the drill press assured a perpendicular hole in the material. This was then used as a guide after one weldment was drilled as accurately as possible in order to get to the second one within a reasonable tolerance.
 CJ
CJ
RV-7
Garmin G3X with VP-X & a TMX-IO-360 with G3i
It's all over but the flying! 800+ hours in only 3 years!
Garmin G3X with VP-X & a TMX-IO-360 with G3i
It's all over but the flying! 800+ hours in only 3 years!
-
Wicked Stick
- Class B
- Posts: 1000
- Joined: Wed Feb 09, 2005 10:00 pm
- Location: KEWB
Thanks CJ,
He is correct in that we only pre-drilled the block of wood on the drill press, then squeezed it between the two horns laying on the bench and used it as a guide to drill straight across from one to the other.
sorry for the confusion on the first post.
He is correct in that we only pre-drilled the block of wood on the drill press, then squeezed it between the two horns laying on the bench and used it as a guide to drill straight across from one to the other.
sorry for the confusion on the first post.
Dave "WS" Rogers
RV-8 (125 hrs & counting)
N173DR
RV-8 (125 hrs & counting)
N173DR

McMaster-Carr part ID
If anyone is interested, here's the bushing I bought from McMaster-Carr.
8491A049 - Steel Headless Press-Fit Drill Bushing/Liner #40 (0.098") ID, 1/4" OD, 3/4" Length, $9.16 EA
I had to work on the bushing a bit with emery cloth to get it into the HS center hinge bracket bearing. This is a press-fit bushing, and the hinge bearing must have been on the small side.
Dave
8491A049 - Steel Headless Press-Fit Drill Bushing/Liner #40 (0.098") ID, 1/4" OD, 3/4" Length, $9.16 EA
I had to work on the bushing a bit with emery cloth to get it into the HS center hinge bracket bearing. This is a press-fit bushing, and the hinge bearing must have been on the small side.
Dave
Dave Setser
Avionics, Firewall Forward
http://www.mightyrv.com
Putting the "slow" in slow-build since 2004
Avionics, Firewall Forward
http://www.mightyrv.com
Putting the "slow" in slow-build since 2004
-
Womack2005
- Class D
- Posts: 486
- Joined: Mon Oct 17, 2005 1:20 pm
- Location: Appleton, WI
-
Wicked Stick
- Class B
- Posts: 1000
- Joined: Wed Feb 09, 2005 10:00 pm
- Location: KEWB
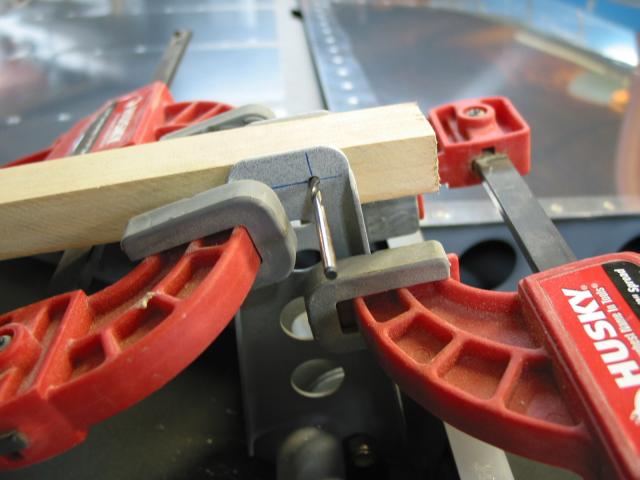
Here's a picture of what I used to drill through my elevator horns.
I measured and drilled the first hole on one, then used the pre-drilled, squared block of wood as a guide to drill through to the other elevator horn.
It worked out just fine, and it's nice and straight, and the elevators work perfectly with no binding whatsoever. Didn't cost me a dime either.
Dave "WS" Rogers
RV-8 (125 hrs & counting)
N173DR
RV-8 (125 hrs & counting)
N173DR
-
Spike
- Chief Rivet Banger
- Posts: 4013
- Joined: Thu Oct 14, 2004 8:40 pm
- Location: Baltimore, MD
- Contact:
And here I thought you guys were talking about drilling the holes for the center bearing on the spar.
http://www.rivetbangers.com - Now integrating web and mail!
Current Build: 2 years into a beautiful little girl
Current Build: 2 years into a beautiful little girl
-
Womack2005
- Class D
- Posts: 486
- Joined: Mon Oct 17, 2005 1:20 pm
- Location: Appleton, WI
-
captain_john
- Sparky
- Posts: 5880
- Joined: Sun Oct 31, 2004 9:17 am
- Location: KPYM
HA!

Miscommunicado!
Well, that is how you do the other hole!
I still haven't drilled the hole you are talking about. I assembled the elevators onto the HS and hung it up on the ceiling a year ago. I figure that when it is all painted and I am balancing the elevators and rigging it all up, I can do it then.
I know, it isn't how others do it, but I want this thing painted before I fly it! It would kill me to take it apart and put it back together in order to paint it. I couldn't endure the downtime!
 CJ
CJ
Miscommunicado!
Well, that is how you do the other hole!
I still haven't drilled the hole you are talking about. I assembled the elevators onto the HS and hung it up on the ceiling a year ago. I figure that when it is all painted and I am balancing the elevators and rigging it all up, I can do it then.
I know, it isn't how others do it, but I want this thing painted before I fly it! It would kill me to take it apart and put it back together in order to paint it. I couldn't endure the downtime!
RV-7
Garmin G3X with VP-X & a TMX-IO-360 with G3i
It's all over but the flying! 800+ hours in only 3 years!
Garmin G3X with VP-X & a TMX-IO-360 with G3i
It's all over but the flying! 800+ hours in only 3 years!
-
Wicked Stick
- Class B
- Posts: 1000
- Joined: Wed Feb 09, 2005 10:00 pm
- Location: KEWB
CJ,
That short piece of tubing I gave you will work out great for doing the bearing hole.
For the bearing hole, I just followed Van's instructions and used a piece of aluminum tubing that is the correct size to fit inside the bearing. I then used a drill bit that was snug to the inside of the tubing to drill the pilot hole.
You start by inserting the aluminum tube snugly into the bearing and mounting only one elevator and drilling from the bearing into the elevator horn, then remove that elevator, and mount the other one and drill again. The bearing and the tube become the drill jig. I did it this way and it worked out great.
Dave "WS" Rogers
RV-8 (125 hrs & counting)
N173DR
RV-8 (125 hrs & counting)
N173DR
-
captain_john
- Sparky
- Posts: 5880
- Joined: Sun Oct 31, 2004 9:17 am
- Location: KPYM
-
Wicked Stick
- Class B
- Posts: 1000
- Joined: Wed Feb 09, 2005 10:00 pm
- Location: KEWB
I can't say that I see the light at the end of the tunnel just yet... That won't happen for probably another years time. I'm reaching that stage of the game where it gets expensive (avionics, instrumentation, prop, etc.)Womack2005 wrote:Spike, I was
WS, thanks for the pic. I wish I was that far along, but I am just now mounting the elevators for the first time. You must be getting to the home stretch?
It's also at that stage in the project where you want to quit your job and work full time on the plane to finish it, but if you do quit your job, then you have no money to pay for it all.
So, I guess I'm off to play the lottery
Dave "WS" Rogers
RV-8 (125 hrs & counting)
N173DR
RV-8 (125 hrs & counting)
N173DR
-
captain_john
- Sparky
- Posts: 5880
- Joined: Sun Oct 31, 2004 9:17 am
- Location: KPYM