Trying very hard to do this by the book. Not that easy from a one size fits all manual. Eventually everything comes together. All in all I'm really pleased with the project.
Everyone's progress looks great, good motivation. I haven't gotten anything done the last month or so due to work and other comittments. Looks like things are coming around a little now so hopefully I can get back to it and post some images of my own progress in the near future.
Thanks to all for posting!
JohnR
RV-7A - Fuselage - SOLD, just not supposed to be
Numbers 6:24 - The LORD bless thee, and keep thee
After a larger than expected distraction (da boat) I am back in the shop and spooling up the airplane makin' machine!
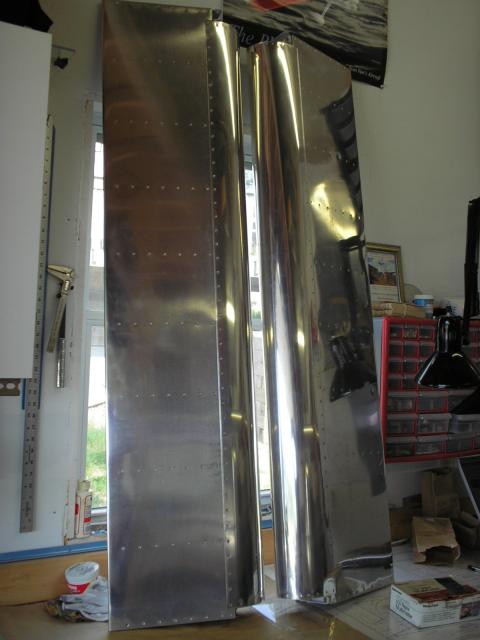
This weekend I cleaned out the shop of all the plastic boat making materials and read the scoop on how to make some flaps. Here are the ailerons, all shiny and new:
...and the shop all cleaned:
I also did some current readings on those seat heaters we all got from the other site. They are gonna pull some juice, but it will be within limits.
Time to make an airplane!!!
CJ
RV-7
Garmin G3X with VP-X & a TMX-IO-360 with G3i
It's all over but the flying! 800+ hours in only 3 years!
Peter, yes... it is a rubber "soft jaw" and it is wrong to be thinking of building while you are supposed to be having fun!
I know this, because I do the same thing!
Those soft jaws are made by Sears and are Craftsman. I haven't seent hem since I bought them. Dunno if Sears still sells them, but I did recently see Kobalt ones at Lowe's if that helps anyone!
CJ
RV-7
Garmin G3X with VP-X & a TMX-IO-360 with G3i
It's all over but the flying! 800+ hours in only 3 years!
OK, we got a little work done this weekend. Beth ran the gun and I bucked.
The VS is FINISHED!
I think she does pretty good work!
- Peter
PS - You might notice that we're putting the skin on with the Rear Spar attached. We did that so we could put the Rear Spar on with 470 4-4's instead of "Pop" rivets as the plans call for. It worked just fine!
Peter Fruehling
RV-7 Wings -> QB Fuse in the shop!
North Oaks, MN -> Home Base (KMIC)
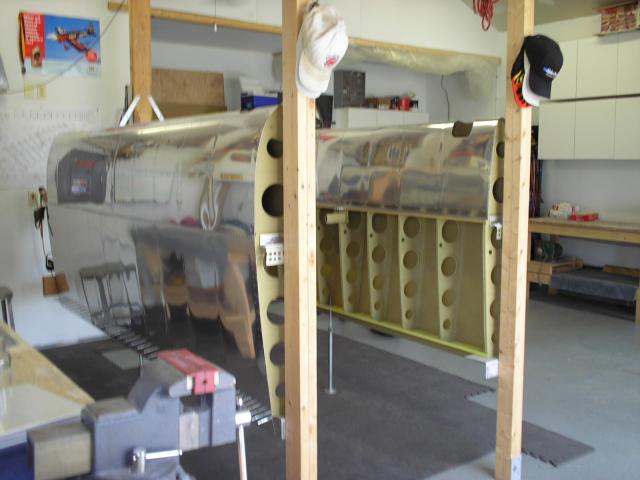
Finally got a photo. Things are coming along. Today while I worked Luke finished match drilling the wing skins for me, broken jaw and all. We removed the bottom skins and clecoed the leading edges and set them on tonight. Seems everyone has a picture at this stage so thought I should too.
Only have one of the W408's drilled, but at least we have made a little progress!
JohnR
RV-7A - Fuselage - SOLD, just not supposed to be
Numbers 6:24 - The LORD bless thee, and keep thee
Luke's doctor told him no lifting over 15 pounds. No rough housing. Stay away from any type of ball or activity where he might get hit by anything. The doctor said he could ride his motorcycle (vetoed by the Mom) and fly, along with other non strenuous activities. We figure the drill doesn't weigh much.
Hello group,
New here, I have the emp done, I now have the wing kit(sb) on order. Dan A. , been trying to call you, I decided on the slow build, put the order in for the wings last week. I would like to insert an image, could somebody tell me the easiest way to do this.
steve allbee
rv7_ wingkit, fuse, finish kit
Spokane, wa
reserved N287RV
If you go over to the "Site Support" forum, the very first few threads talk about how to use the site, and some are specific tutorials on how to post images.
-- John
http://www.rivetbangers.com - Now integrating web and mail!
Current Build: 2 years into a beautiful little girl
Welcome to the group Steve! Nice to have you here! Give us some pics of that emp, and wing kit sometime soon. It's easy to do, and the instructions in Site Support are easy and clear.
N200PF wrote:
BTW - Did you make those wing Jigs or can you purchase those somewhere?
- Peter
Peter, I copied Rudi's stands as well, and I think I had about $135 in them including the hardware and angle. I bought the steel tubing and foot angle from the welding shop, and they cut the tubing and welded the feet for me. Their charge was right around $100 materials and labor.
Rudi's are light grey, John's are red, and mine are yellow...so you had better get going to get the color you want!!
I have read over them a couple times, my problem is when things are easy, sometimes things just don't click. I'm assuming that I click on the Img button and then I have my pics in a url or a web page, I then enter that web address and then the pic will show up in that spot on my message. Am I correct.
steve allbee
rv7_ wingkit, fuse, finish kit
Spokane, wa
reserved N287RV
That sounds about right Just make sure that you click the img button again after you enter the URL so that the end tag gets included. It should look something like:
The only thing that gives me grief on this is that the cursor ends up positioned *before* the image tag, so I have to reposition it before pasting the URL. I usually just end up hitting the image tag twice in succession and then pasting the URL in between them, since I have to reposition the cursor anyway.
Maybe it's just because I'm one of those weirdo commie hippie types who uses a Mac.
Thanks for the info. in other words you post a message and treat it like doing html web page building, well almost. Now I just need to get my web page address and upload my pics I want to post. Thanks
steve allbee
rv7_ wingkit, fuse, finish kit
Spokane, wa
reserved N287RV