Page 1 of 3
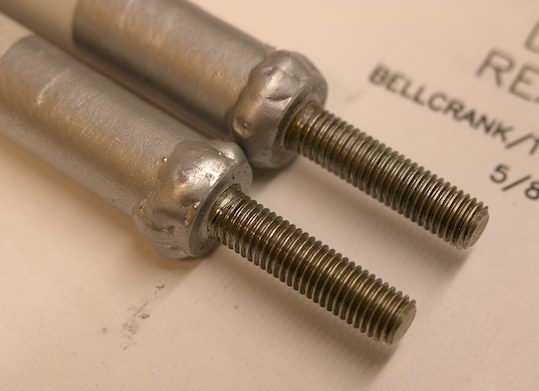
Got the Aileron Pushrods welded!
Posted: Fri Jan 11, 2008 2:46 pm
by smittysrv
I went to a local shop were they build custom choppers to get my aileron pushrods welded. I figured these guys must be into finesse. Lonnie, at
Denton County Choppers (
http://www.dentoncountychoppers.com/) in Frisco, TX, did a fantastic job on these puppies. He told me that he scotchbrited everything down, did the welds, and even primed everything after he finished, making sure not to get any primer on the screw ends. Very nice! He also said that if anyone wants to ship their stuff to him for welding, he would be open to that.
Posted: Fri Jan 11, 2008 2:47 pm
by tmbg
I'll probably weld mine myself

Posted: Fri Jan 11, 2008 2:49 pm
by cjensen
That's neat and all...but why?

Seems WAAAAAAY overkill for a design that is sound.
Posted: Fri Jan 11, 2008 2:52 pm
by tmbg
the plans call for them to be riveted or welded.
Considering that my building partner is a certified aerospace welder, and BOTH of us have Miller Syncrowave TIG welders, I think I'll just weld it
Posted: Fri Jan 11, 2008 2:54 pm
by captain_john
Chad, noooo... it's an option in the plans.
Smitty, IIRC the plans say to grind it all down smooth afterwards, FWIW.
I guess they say that for clearance through the rear spar. If you clear, I bet it is fine.
Looks nice!

CJ
Posted: Fri Jan 11, 2008 3:10 pm
by cjensen
I know it's an option to weld, but I still question why...
Nevermind, it's a silly question for me to ask.
Posted: Fri Jan 11, 2008 3:15 pm
by RV7Factory
Looks great Smitty. Where's the cool custom chopper paint job?


Posted: Fri Jan 11, 2008 4:09 pm
by rv8or
cjensen wrote:That's neat and all...but why?
Seems WAAAAAAY overkill for a design that is sound.
I've considered this too. Those -12 rivets are THE WORST rivets on my entire project so far...and I drilled 'em out and replaced 'em once already. They still look terrible. Tech counselor says they're okay, but I don't like the look of them. Seems a weld would let me sleep better.
J
Posted: Fri Jan 11, 2008 4:13 pm
by Lorin Dueck
Smitty -
Looks Great!

I'm right there too - and plan on asking some folks at work if they'd weld them for me.
If they can't / wont - my fall back position is to rivet them using my C-Frame to help with alignment.
Lorin D
9A Wings
N194LD reserved
Posted: Fri Jan 11, 2008 4:16 pm
by captain_john
Here's how you squeeze those rivets:
http://www.rivetbangers.com/cgi-php/for ... e+squeezer
They come out great!
Read the above thread for details on how it's done!
CJ
Posted: Fri Jan 11, 2008 4:23 pm
by RV7Factory
captain_john wrote:Here's how you squeeze those rivets:
Just another data point... I squeezed some and shot-n-bucked the rest. IMHO, shooting these was MUCH easier.
Posted: Fri Jan 11, 2008 4:53 pm
by cjensen
Another data point...I used my DRDT-2 to squeeze those. Worked okay, just make sure the thing is anchored!
Posted: Fri Jan 11, 2008 5:11 pm
by captain_john
ANOTHER data point, the callouts were long. I think it was the first and only time in the history of Vans!

CJ
Posted: Fri Jan 11, 2008 6:04 pm
by smittysrv
I'm with Joe on this. There are really only 2 reasons for my opting for the welding. I suck at drilling hard steel. I suck at squeezing long 1/8" rivets. Hmm... that about sums it up! Oh yeah, one other thing, I'm lazy!!
Have a goodun!
Posted: Fri Jan 11, 2008 6:08 pm
by cjensen

Those reasons are good enough for me Smitty!
Posted: Sat Jan 12, 2008 12:49 am
by cnpeters
I did the same as Chad with the DRDT-2. I grinded the overlong rivets down a tad, then used the dimpler with cups sets. Worked great, just took a few minutes, and the shop heads were nicely rounded especially wiggling the pushrod around a little at the end of the squeeze.


new here but
Posted: Sat Jan 12, 2008 9:14 am
by weezbad
there is nothing wrong with welding the p/rods but your welder should be familar with the following and probally meets or exceeeds this but would be good for him to paruse this info
http://rgl.faa.gov/Regulatory_and_Guida ... r%2004.pdf
i may be wrong (im sure you will tell me if i am

)but a weld is not to be ground away.the only grinding you do is with a file and that is where the weld terminated. there will be a tiny crater that should be removed to prevent crack propagation. i dont see where the plans mention this.they even show the weld as built up . please point me to this info.


the cadmium plating on the threads is removed by the welding process from the intense heat. and the plating should be removed on the base section prior to welding. the inside of the tube should be primed (which burns away when welded) or coated with linseed oil. its all in the 43.13-1b
weld on one end put in a small amout of oil, weld the other end. slosh then oil around and install component. Bell 206 jet ranger has eng mount tubes that are done this way except the oil is installed post weld and a rivet placed in the fill hole.
i had mine welded but realizing the cad plating was gone and needing to have them replated i opted to just make them the standard way. if i was doing it again i would have used monel rivets.

well im going outside to install my switches and breakers
Posted: Sat Jan 12, 2008 9:40 am
by captain_john
I don't see anywhere where the weld cannot be ground away. Once the 3 materials have been made one in the process, any excess material serves no useful purpose.
If that bead is large enough to interfere with the operation of the controls, it must be ground away. If not it would be considered optional. Reasons for removal would be lightening, aesthetic and possibly to relive stress on the materials.
Now, what wiring do you need to do!?! Want me to pull the permit?
CJ
Posted: Sat Jan 12, 2008 9:54 am
by smittysrv
There's not much on the care and feeding of steel welding in the instruction book. Being the highly anal retentive computer programmer that I am, I scanned the instructional part of the book into a database so I could search it from my website (Sorry it's not public. I don't want to get in deep doo-doo with the man). Here's the only reference in the instructional portion of the instruction book.
And I quote (ah-hem):
"The steel used in RVs is all 4130 grade. mostly in the form of thin plate and thin wall seamless tubing. 4130 is a high strength, high carbon steel used extensively in the aircraft industry because of its high strength and relatively good workability.
Most steel parts supplied in RV kits are powder coated at the factory, meaning that there is little for the builder to do except install it. On a few parts, where the sequence of welding or forming operations makes powder coating at the factory impractical, the builder may paint the part in his shop. The best method of cleaning is bead-blasting, but some work with a stiff brush and solvent will do the job.
Steel parts should be primed and painted immediately after cleaning to prevent rust."
ooook
Posted: Sat Jan 12, 2008 11:47 am
by weezbad
the only reason i mention what i do is based on literature that i have studied in the past...i have been in this exact spot before with my own tubes. the ac 43.13 specifically has many requirements for welding chromoloy. after reading all the prep stuff i went back to the original method. as far as clearance the rivets pose more of an interferance issue than the weld.
 http://rgl.faa.gov/Regulatory_and_Guida ... r%2004.pdf
page 4-55
it is not my intention to ruffle anyones feathers..
CJ i would love for you to wire my plane i will go hunting or watch and drink a cold one
