Page 1 of 2
Ugggh, can I quit?
Posted: Sat Feb 13, 2010 8:25 pm
by Spike
Any ideas on how to deal with this other than replacement?

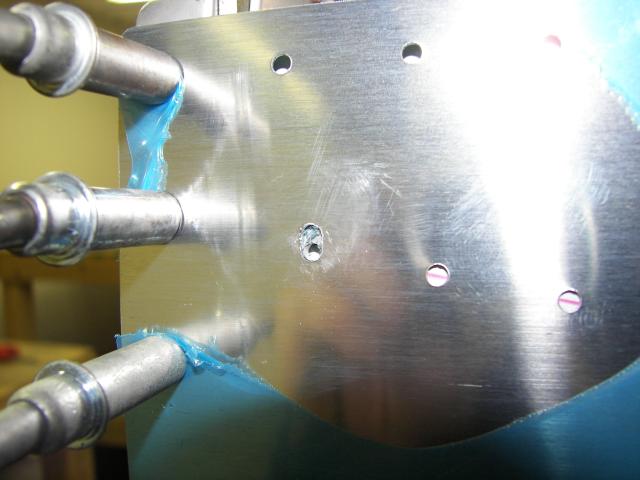
I had a fantastic day in the shop today and I had to finish it up by potentially wrecking a $100 fuse skin. I'm so

and

that I could

I didn't notice while I was drilling that the clamps holding the underlying angle had loosened up and the angle shifted behind the skin allowing the drill to act like a router.
Shoulda just bought a Trinidad....
Posted: Sat Feb 13, 2010 8:42 pm
by Brantel
Never fear Spike.....
Just drill out to as large a rivet that is required to make that go away...
Nobody will ever notice that you have an oddball larger rivet here and there......
Or just put a flat head screw in there and make the one on the other side match...
Posted: Sat Feb 13, 2010 8:59 pm
by cjensen
Yep...exactly what Brian said...


Posted: Sat Feb 13, 2010 9:00 pm
by Spike
I thought about that. Dimensions of that trench are 0.133" x 0.223". That would be a mighty big rivet. I hadnt thought about the screw idea. That might be a winner.
Posted: Sun Feb 14, 2010 12:06 am
by captain_john
Winner winner chicken dinner!
Screw it, but watch your edge distance!
It isn't how you screw it up. It is more about how you fix your screw ups!
CJ
Posted: Sun Feb 14, 2010 9:15 am
by RVNewsletter
One of the fun things about nearly finishing an RV project, is looking back at all of the mistakes made in the relatively early stages of the project that seemed so dire at the time, that turn out to be no big deal.
Posted: Sun Feb 14, 2010 10:46 am
by bullojm1
Since it's only one hole, I wouldn't worry at all about any safety issues. What I would do is debur the oblong hole, dimple the hole as best you can for where the rivet is supposed to be and then install it. Once its all riveted together toss some epoxy/filler mixture on it and be done with it. Once your bird is painted no one will ever know -- including you! The only other option is ordering a new side skin ($75 + shipping) + wasting all the time to wait for it.
Posted: Sun Feb 14, 2010 1:46 pm
by Spike
Interesting idea on the epoxy. I am with you, I hate the idea of trashing a $100 worth of aluminum for one hole. I will take measurements tonight to see about using a flush headed screw with AN nut and go from there.
Spike
Posted: Sun Feb 14, 2010 2:06 pm
by hydroguy2
I vote, Move on. Put a oops rivet in there best you can and touch it up at the body shop. No one will ever notice and safety is not an issue from 1 rivet.
Posted: Mon Feb 15, 2010 8:46 pm
by Spike
Thanx to all of you guys for talking me down.

This booboo really put me on the edge for some reason. Maybe because I had been having a great day in the shop. Its probably also because I am getting the itch to fly again and this project is a ways from being done.
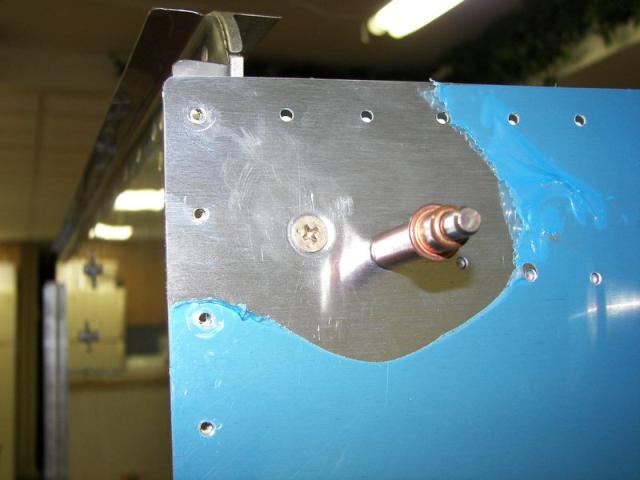
Anyway I went with a AN509-10R screw and I am tickled with the way it came out. It was a bit delicate making sure the new enlarged hole was centered where it needed to be but all is well.
I owe somebody a


I luv you guys!
Spike
Posted: Mon Feb 15, 2010 9:25 pm
by cjensen
Excellent Spike! Nice fix, nice work!!
Posted: Tue Feb 16, 2010 2:52 am
by BSwayze
Nice job, Spike!
You're not the only one with boo-boos. I drilled that whole line (and the same one on the other side) to #30 before realizing my mistake. My RV now has two lines of 1/8" rivets instead of 3/32" rivets. Not one person visiting my shop and looking at my project has noticed.
Posted: Tue Feb 16, 2010 7:13 am
by Spike

Isn't that line 1/8" rivets? That is what is called out on my plans. Is the RV-7 different? I think you got it right buddy!
Spike
Posted: Tue Feb 16, 2010 7:15 am
by Spike
Oh, you mean you did the *whole* line instead of just the ones at the firewall attach. Hmm, ya know what, I did too. *snicker*
Spicer
Posted: Tue Feb 16, 2010 9:59 am
by TomNativeNewYorker
I would prime and paint the hole, dimple and screw. I would also install the screw wet with proseal as well.
The purpose is to prevent the different metals from contacting each other in order to prevent dissimilar metal corrosion.
Posted: Tue Feb 16, 2010 10:14 am
by Spike
Hmmm, which metals are we worried about? This is just about a duplicate of what we do with the lower forward fuse longerons and the firewall brackets. The biggest difference is that this is a screw instead of a bolt. Edumacate me dude.
Copy it
Posted: Tue Feb 16, 2010 11:28 am
by Gregg Swartley
I might copy the mistake on the other side to have it match. That way somebody looking at the plane sees the same on both sides and thinks it's that way for a reason.
Posted: Tue Feb 16, 2010 11:48 am
by Spike
I am planning on doing exactly that! Thanx
Spike
Posted: Tue Feb 16, 2010 12:26 pm
by TomNativeNewYorker
Spike wrote:Hmmm, which metals are we worried about? This is just about a duplicate of what we do with the lower forward fuse longerons and the firewall brackets. The biggest difference is that this is a screw instead of a bolt. Edumacate me dude.
The aluminum skin and rib can can become corroded if you just let it all sit bare. Protection is the best thing you can do to limit the corrosion.
GALVANIC CORROSION. Galvanic corrosion
occurs when different metals are in contact with each
other and an electrolyte, such as sea water. It is usually
recognizable by the presence of a buildup of corrosion
deposits at the joint between the metals. For example,
aluminum skin panels and stainless steel doublers,
riveted together in an aircraft wing, form a galvanic
couple if moisture and contamination are present.
Figure 3-8 shows galvanic corrosion of magnesium
adjacent to steel fasteners. The potential for galvanic
corrosion is greatest when the two metals are well
separated from each other in the galvanic series (see
Figure 3-4) and are in electrical contact.
Posted: Tue Feb 16, 2010 12:43 pm
by TomNativeNewYorker
Here is a picture of some extreme exfoliation corrosion adjacent to an anchor nutplate.

You dont see the anchor nut corroded do you?
Understand dissimilar metal corrosion now?