Elevator Pushrod is Rubbing

A forum in which to discuss topics specific to the assembly of the RV 7/7A.
Post Reply
User avatar
BSwayze
Class C
Posts: 581
Joined: Wed Jun 27, 2007 5:15 am
Location: Portland, Oregon
Contact:

Elevator Pushrod is Rubbing

Post by BSwayze »

I installed the elevator pushrods in my RV-7A fuselage and was very disappointed to hear something rubbing when I tested the forward-aft movement. I checked everything and I can't find anything wrong with my installation. I located where the rubbing problem is. It's the smaller forward pushtube, rubbing on the bottom of the hole through the F-705 bulkhead.

Here's a picture of the tube passing through the F-705. The tube moves up and down in the hole as it goes through it's forward-aft motion. In this shot, it's in the all-the-way-up position (stick full forward or full back). There's approximately 3/8" clearance remaining over the top of the tube.

Image

This picture is blurry (sorry) but here the tube is all the way down, roughly when the stick is in the neutral position. The tube rubs on the bottom of the hole. It's not right to have 3/8" clearance at the top and have it rubbing on the bottom.

Image

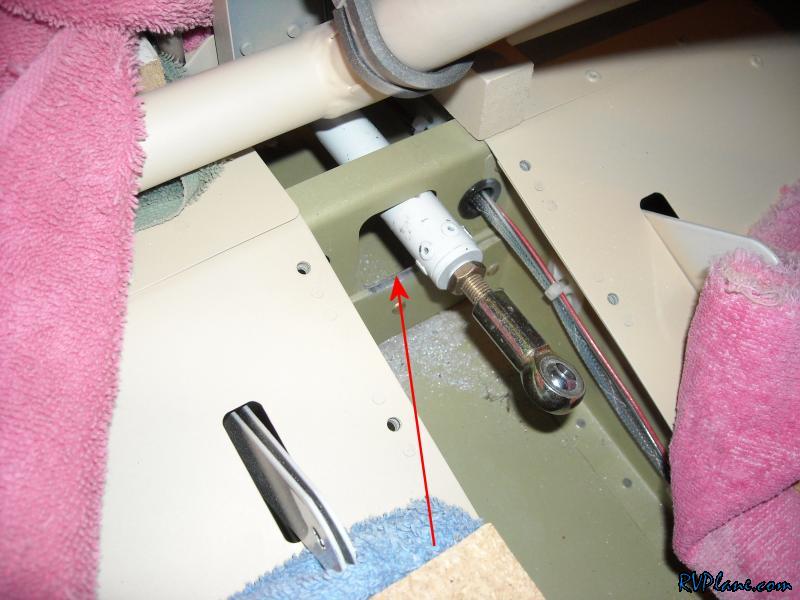
I put an inspection mirror under the tube in the bottom of the channel and took this picture. You can see how the rubbing of the tube is scraping the primer off the tube.

Image

Has anyone else had this problem?

My first thought was to file away the bottom of the hole a little bit and enlarge the hole, but this is the rear spar stiffener for the wings and I'm afraid of weakening it.

I'm also wondering if my control column weldment, WD-610-PC, was made wrong. If the short descending arm that holds the pushrod is too long, it explains everything. I measured mine, and it's 3-5/8" from the bottom surface of the weldment to the middle of the bolt hole:

Image

Is this the proper length? I can't find any dimensions for any of Vans weldments. How do some of yours compare?

Any comments or help greatly appreciated.
Bruce Swayze
Portland, Oregon
http://www.BrucesRV7A.com
RV-7A Working on Firewall Forward

Spike
Chief Rivet Banger
Posts: 4013
Joined: Thu Oct 14, 2004 8:40 pm
Location: Baltimore, MD
Contact:

Post by Spike »

Do you have the travel limits set appropriately for elevator movement?

Spike
http://www.rivetbangers.com - Now integrating web and mail!
Current Build: 2 years into a beautiful little girl

User avatar
bullojm1
Chief Rivet Banger
Posts: 1367
Joined: Sat Mar 25, 2006 6:37 pm
Location: KDMW
Contact:

Post by bullojm1 »

Bruce-

Common RV problem! I went through this the other week on my project. I remedied it by using a dremel with a sanding drum to open up the hole a little. I think I ended up with 1/32 - 1/16" clearance when it was all done.

You can see in this pic the exposed metal on the bottom of the F-705 bulkhead where I trimmed it down:

Image
Mike Bullock
http://www.rvplane.com
RV-7 | Superior IO-360 | Whirlwind 200RV
Garmin GTN650 | GRT Dual Sport SX EFIS
Status: FLYING!

User avatar
BSwayze
Class C
Posts: 581
Joined: Wed Jun 27, 2007 5:15 am
Location: Portland, Oregon
Contact:

Post by BSwayze »

Spike, no I don't have the empennage mounted yet. Trouble is, the rubbing occurs right in the middle of the movement, i.e., neutral position of the stick. So I don't see how the travel limits at the extreme ends of the movement could make any difference.

Mike, thank you!! I had never heard how common this is. I just didn't want to take a dremmel or sander to that bulkhead without asking around first because it's the carry-through stiffener for the rear wing spar, and I'm afraid of weakening it.

The more I think about it, Vans could solve this problem for every one of us by making the arm on the weldment about 3/16" shorter.
Bruce Swayze
Portland, Oregon
http://www.BrucesRV7A.com
RV-7A Working on Firewall Forward

Spike
Chief Rivet Banger
Posts: 4013
Joined: Thu Oct 14, 2004 8:40 pm
Location: Baltimore, MD
Contact:

Post by Spike »

Ah, OK Bruce, I got ya. It was just a swag. Ill be on the lookout for that with mine. One thing I believe is that there is a fair amount of variability in the tolerances of these pre-welded powder coated parts. Glad Jim was able to help out.

Spike
http://www.rivetbangers.com - Now integrating web and mail!
Current Build: 2 years into a beautiful little girl

Spike
Chief Rivet Banger
Posts: 4013
Joined: Thu Oct 14, 2004 8:40 pm
Location: Baltimore, MD
Contact:

Post by Spike »

Err, Mike I meant. Sheesh, must be time for bed. Sorry Mike.

Spike
http://www.rivetbangers.com - Now integrating web and mail!
Current Build: 2 years into a beautiful little girl

User avatar
cjensen
Whiskey Victor
Posts: 5275
Joined: Sat Apr 23, 2005 10:36 pm
Location: Green Bay, WI

Post by cjensen »

Exact same issue on mine...

Image

Dremel'd it down and have the same clearance Mike has...

8)
Chad Jensen
Missing my RV-7...
Vertical Power support
920.216.3699
http://verticalpower.com

User avatar
BSwayze
Class C
Posts: 581
Joined: Wed Jun 27, 2007 5:15 am
Location: Portland, Oregon
Contact:

Post by BSwayze »

Thank you, gentlemen, for all your prompt replies! I had no idea this was so common. I'm more convinced than ever that Vans needs to shorten the arm on the weldment by about 3/16". It would help everyone.
Bruce Swayze
Portland, Oregon
http://www.BrucesRV7A.com
RV-7A Working on Firewall Forward

Bob Barrett
Class C
Posts: 625
Joined: Sat Nov 13, 2004 8:37 pm
Location: Sartell MN

Post by Bob Barrett »

I encountered a similiar problem on my RV-6A and had to file eh upper portion of the hole larger. On my RV-6A that push tube hit on the top of the hole. It works fine now. The weldments may be the same from the 6's to the 7's or they may be different. I know the "tunnel" on the 7 is different than on the 6.

User avatar
BSwayze
Class C
Posts: 581
Joined: Wed Jun 27, 2007 5:15 am
Location: Portland, Oregon
Contact:

Post by BSwayze »

Well, here's an update. I got 'er fixed. I had also written to Vans. I got a nice reply from Ken Scott. He said to go ahead as many of you have done, as long as it's no more than 1/8" of material to give the necessary clearance, making sure to radius and smooth the work.

Here's a shot of my work. It took less than 1/16" to give me all the clearance I need. I used my dremmel and a sanding drum, and my die grinder with a fine scotchbrite wheel to polish it up. A Q-tip made applying a new coat of primer real easy.

Image

I wrote back to Ken and took some time to give him some builder feedback. I explained all the reports I had received from these forums, and I urged them to shorten the arm on the control stick weldment by about 3/16", as this would solve the problem. It won't help any of us, but it would help future builders. If more of us do this, it will only help make things even better. My suggestion: be polite and respectful and stick to the facts. Ken said they would look into it.

Thanks again, guys, for all your help. You guys are the best!
Bruce Swayze
Portland, Oregon
http://www.BrucesRV7A.com
RV-7A Working on Firewall Forward

Post Reply