In just a few minutes, my ribs will be riveted to the front and rear spar. It's at this point in everyone's builder's log that they build that huge wing jig and hang the wings for skin.
Could I matchdrill the wing skins while the wing skeleton is still on the workbench? Does it have to be hanging on a jig?
I haven't studied the manual far ahead enough to know exactly WHY the wings need the wing jigs, but I have seen that people are making fine measurements once they are in the jig. I'm assuming that once it get's riveted, one has to be sure there is not twist to the wing.
But I'm thinking for just matchdrilling, it can be done on the bench. Yes/no?
Wing skin match drilling...
Wing skin match drilling...
RV-7 Working on Wings
Build Log: http://www.aircraftstickers.com/RV7A/RV7A.htm
RV Stickers: http://www.aircraftstickers.com
Build Log: http://www.aircraftstickers.com/RV7A/RV7A.htm
RV Stickers: http://www.aircraftstickers.com

You really should make the jig. The point of the jig is to make sure the wing doesn't have any twist in it or a sag.
Mike Bullock
http://www.rvplane.com
RV-7 | Superior IO-360 | Whirlwind 200RV
Garmin GTN650 | GRT Dual Sport SX EFIS
Status: FLYING!
http://www.rvplane.com
RV-7 | Superior IO-360 | Whirlwind 200RV
Garmin GTN650 | GRT Dual Sport SX EFIS
Status: FLYING!

I went through this same thought process when I was putting my wings together. The plans seem to be dated back to when a jig was required to keep the frame square while drilling the skin into the ribs, holding each corner of the frame in position. I soon learned that the pre-drilled skin was really the deciding factor in making the wing come together without any oil-canning. So I basically put the main spar on the jig, supported on each end, allowing the skin to determined the wings squareness when clecoed together. I let the rear spar hang free as much as possible. The result was a nice straight wing without any oil-canning. Using this thought process, I suppose one could build the wing without a jig, but it would require a large work area and someone to help you move it around as it grew in size and weight. To me the term "jig" would better interpreted as a "support" to help you while you work.
-
Spike
- Chief Rivet Banger
- Posts: 4013
- Joined: Thu Oct 14, 2004 8:40 pm
- Location: Baltimore, MD
- Contact:
Build it. You will need to hang it anyway later on just to get good access to places. And like previously mentioned the skin is what us used to get it really square and that will be easier with fewer points of contact between the wing and what is supporting it.
Spike
Spike
http://www.rivetbangers.com - Now integrating web and mail!
Current Build: 2 years into a beautiful little girl
Current Build: 2 years into a beautiful little girl
Fixture before skins
The only way you can be sure the wing is built without twist is to fix the locations of the main and rear spar.
I would build the fixture first.
Robert
I would build the fixture first.
Robert
Ok I will stop now and buld the jig. My thinking was that I could match drill the top skins now on the bench, and then build the jig to finish the wing.
Why? Only because I have 3 more days off of work and I wanted to keep moving along. It will be a while before I can get some friends to drive here to help build this jig. Building that jig and attaching it to the floor and ceiling looks like a two person job!
Why? Only because I have 3 more days off of work and I wanted to keep moving along. It will be a while before I can get some friends to drive here to help build this jig. Building that jig and attaching it to the floor and ceiling looks like a two person job!
RV-7 Working on Wings
Build Log: http://www.aircraftstickers.com/RV7A/RV7A.htm
RV Stickers: http://www.aircraftstickers.com
Build Log: http://www.aircraftstickers.com/RV7A/RV7A.htm
RV Stickers: http://www.aircraftstickers.com
Not two person
I built my fixture out of 2x4's (and I'm in the steel business). I did hand pick the wood for straightness and glued and screwed a couple of 2x4's together for each post. Easy peasy.
Buy some cheap clips in the hardware section and bang the thing together and you will still have 2.8 days of vacation left
Robert
Buy some cheap clips in the hardware section and bang the thing together and you will still have 2.8 days of vacation left
Robert
I was able to build my wing jig over three days by myself, and that's with a few setbacks:
http://www.rvplane.com/?categoryid=3&dayid=183
http://www.rvplane.com/?categoryid=3&dayid=184
http://www.rvplane.com/?categoryid=3&dayid=185
http://www.rvplane.com/?categoryid=3&dayid=183
http://www.rvplane.com/?categoryid=3&dayid=184
http://www.rvplane.com/?categoryid=3&dayid=185
Mike Bullock
http://www.rvplane.com
RV-7 | Superior IO-360 | Whirlwind 200RV
Garmin GTN650 | GRT Dual Sport SX EFIS
Status: FLYING!
http://www.rvplane.com
RV-7 | Superior IO-360 | Whirlwind 200RV
Garmin GTN650 | GRT Dual Sport SX EFIS
Status: FLYING!

I was able to build my wing stand, too, by myself. You'll find, as you go ahead, that there are a lot of tasks that seem daunting, or even formidable! But once you get into it, it's not that bad.

I was able to figure out how to build my wing stand so that I could still open my garage door. You can check it all out here:
http://www.europa.com/~swayze/RV-7A/Wings/20070903.html
I was able to figure out how to build my wing stand so that I could still open my garage door. You can check it all out here:
http://www.europa.com/~swayze/RV-7A/Wings/20070903.html
Bruce, I've just been looking at your builder's log and looking at this exact pic you just posted! I will build mine similair to yours. That's gotta feel good having your wings in teh stand and seeing those skins clecoed on!!
RV-7 Working on Wings
Build Log: http://www.aircraftstickers.com/RV7A/RV7A.htm
RV Stickers: http://www.aircraftstickers.com
Build Log: http://www.aircraftstickers.com/RV7A/RV7A.htm
RV Stickers: http://www.aircraftstickers.com
Thank you, Mark!
The good news is, the construction adhesive I used to hold the 4 x 4's to the floor scraped right off when I was finished with the wings, and the tiny holes from the screws into the wall and ceiling were easily patched up and touched up with paint. You'd never know the jig was there.
Yes, it's a great feeling to have it all set up and the wings coming together nicely. You're gonna love it.
Good-I was wondering about that glue on the concrete! Glad to know that it comes up.
RV-7 Working on Wings
Build Log: http://www.aircraftstickers.com/RV7A/RV7A.htm
RV Stickers: http://www.aircraftstickers.com
Build Log: http://www.aircraftstickers.com/RV7A/RV7A.htm
RV Stickers: http://www.aircraftstickers.com
Man this wing jig has been intimidating me since before I even ordered my kit! Today I just started nine days off of work and my only goal for today was to build this dang jig.
I don't know what I was so worried about, but it came out just fine. I had to re-arrange my entire garage and move workbenches to make everything fit, but it's done.
The car gets in the way but I just pull it out when I work on the wings. I don't drive it in the winter so it's kind of in the way in the garage but I don't want to store it outside.
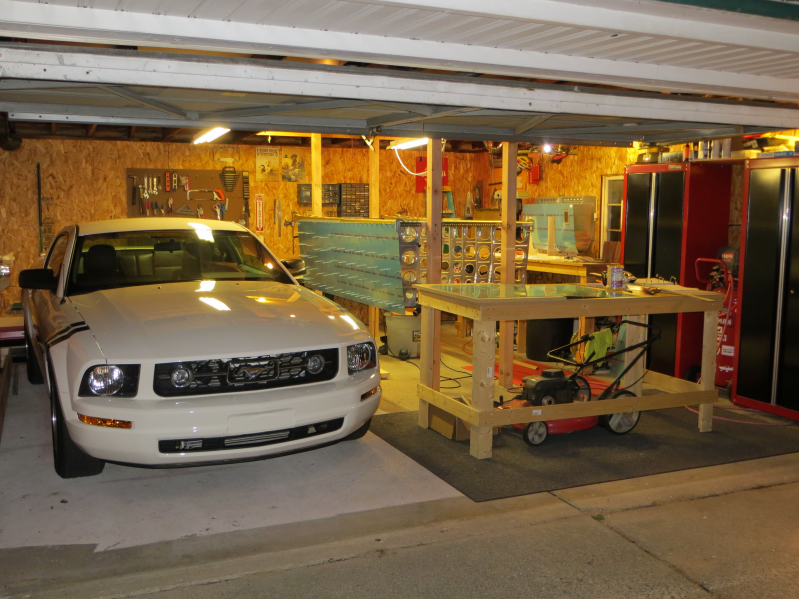
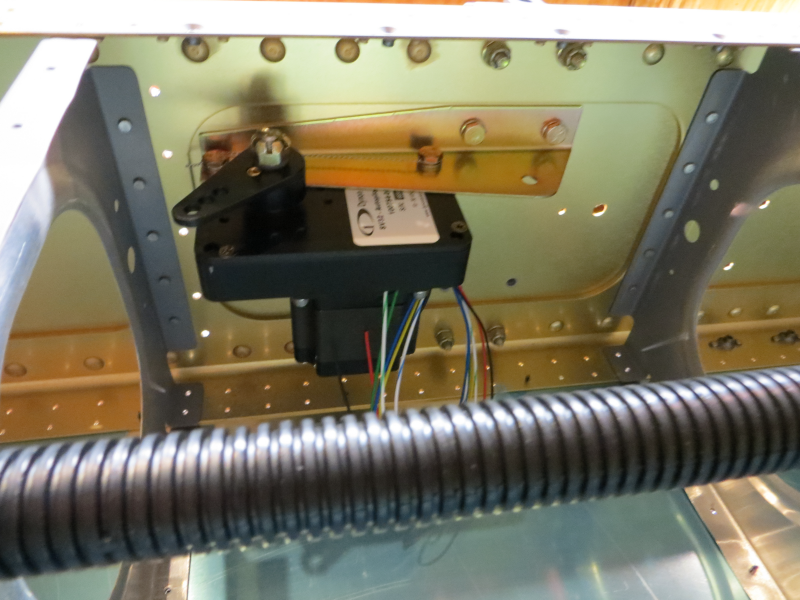
Not only did I get the wing jigs build, but I also clecoed on the skin on the right wing after making the walkway doubler. AND...I installed the Dynon autopilot servo in the right wing!
Huge progress today! I can't wait to see what I can accomplish in the next 8 days!!
I don't know what I was so worried about, but it came out just fine. I had to re-arrange my entire garage and move workbenches to make everything fit, but it's done.
The car gets in the way but I just pull it out when I work on the wings. I don't drive it in the winter so it's kind of in the way in the garage but I don't want to store it outside.
Not only did I get the wing jigs build, but I also clecoed on the skin on the right wing after making the walkway doubler. AND...I installed the Dynon autopilot servo in the right wing!
Huge progress today! I can't wait to see what I can accomplish in the next 8 days!!
RV-7 Working on Wings
Build Log: http://www.aircraftstickers.com/RV7A/RV7A.htm
RV Stickers: http://www.aircraftstickers.com
Build Log: http://www.aircraftstickers.com/RV7A/RV7A.htm
RV Stickers: http://www.aircraftstickers.com
-
Spike
- Chief Rivet Banger
- Posts: 4013
- Joined: Thu Oct 14, 2004 8:40 pm
- Location: Baltimore, MD
- Contact:
Very nice work, you got lots of stuff done. The wings will get monotonous but it will be worth it.
Spike
Spike
http://www.rivetbangers.com - Now integrating web and mail!
Current Build: 2 years into a beautiful little girl
Current Build: 2 years into a beautiful little girl
Thanks Bruce-I am really looking forward to bulding the fuselage. The wings are getting kind of boring especially now because there's not a lot of visual progress.
I just received my new fluting tool so tomorrow I will hope to get at least one fuel tank clecoed together.
The fuse is going to be the 'fun' part! Can't wait.
I just received my new fluting tool so tomorrow I will hope to get at least one fuel tank clecoed together.
The fuse is going to be the 'fun' part! Can't wait.
RV-7 Working on Wings
Build Log: http://www.aircraftstickers.com/RV7A/RV7A.htm
RV Stickers: http://www.aircraftstickers.com
Build Log: http://www.aircraftstickers.com/RV7A/RV7A.htm
RV Stickers: http://www.aircraftstickers.com
-
Spike
- Chief Rivet Banger
- Posts: 4013
- Joined: Thu Oct 14, 2004 8:40 pm
- Location: Baltimore, MD
- Contact:
I had thought that the wings would be fun and the fuse boring. Boy was I wrong. The wings got to be dreadful and never ending. The fuse though, it was a blast. Everything was different. You really learn to read drawings with the fuse 
Spike
Spike
http://www.rivetbangers.com - Now integrating web and mail!
Current Build: 2 years into a beautiful little girl
Current Build: 2 years into a beautiful little girl