I test fit all my instruments and avionics into my panel. Everything fits well. I think I have about all the space used up:-) There will be a few more switches on the side panels.
I'm curious, when you laid it all out with the panel planner, and before you submitted it to get Water Jet cut, did you double check the depth so that nothing interferes with the z-shaped cross supports to the gear towers ???
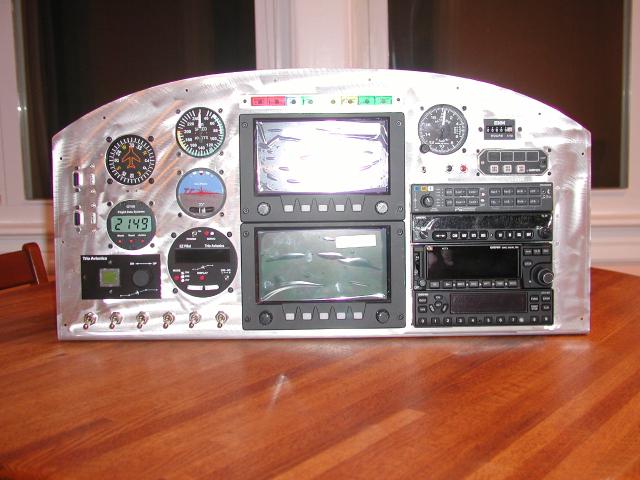
How happy are you with the dimensions and fit from the water jet cutting ?
The only thing deep enough to interfere with the cross members is the SL-30 and I checked that before I laid it out. The fit was excellent. A couple of the holes were very slightly small, but I think it only took me about 30 minutes to get everything to fit nicely. All the mounting holes were right on. The panel was laser cut, not water jet so there was a little burning and slag on the back but it only took about 5 minutes to clean that up. The cutouts are very crisp. All in all I'm very happy with it.
Initially I used epanelbuilder to lay it out but I found that it was not accurate enough. What looked like it would work on epanelbuilder would not actually work on the panel. Epanelbuilder is great to get a view of the panel, but you can't lay it out accurately enough with it for the final product. I got the people at Experimentalair to send me the panel outline in CAD format and I laid it out myself and sent my drawing to them to finalize. Except for the mounting holes, my drawing was accurate enough to cut from and the CAD guy only had to make some minor adjustments and add the mounting holes and output it in the proper form for the cutter. He had templates for most of the instruments and I provided exact placement and dimensions for my custom stuff.
The guys at Experimentalair were great to work with. We sent drawings back and forth several times until I was happy with it. I printed the drawing full size and taped it to the panel in the plane to see if I could reach everything.
I still have to cut some holes in the side panels myself. Since I had already primed the side panels, I couldn't have them laser cut, but there are only a few holes and they are mostly just round holes for switches. I'll get that done this weekend and paint the panel.
By the way, I got my prop today. I haven't opened the box yet though.
Really NICE Panel! You will love the Trio Auto pilot. I have both on my 8, and they work just as well(well almost) as the one in the Challenger I fly for a livin.
Al Grajek
Lexington, Ky
jetjoc wrote:Really NICE Panel! You will love the Trio Auto pilot. I have both on my 8, and they work just as well(well almost) as the one in the Challenger I fly for a livin.
Al Grajek
Lexington, Ky
Now that is a great piece of info! Im looking to do the trio myself if I ever make it that far.
http://www.rivetbangers.com - Now integrating web and mail!
Current Build: 2 years into a beautiful little girl
I'll open it this weekend. I want to keep the box intact and didn't have the right tools to pull out the staples without ripping the box up. SInce it is a 3-blade prop, I wan to kee the box in case I ever have to ship it somewhere.
You should get in the 4 of yours and fly down and take a look:-)
I'll open it this weekend. I want to keep the box intact and didn't have the right tools to pull out the staples without ripping the box up. SInce it is a 3-blade prop, I wan to kee the box in case I ever have to ship it somewhere.
You should get in the 4 of yours and fly down and take a look:-)
Sure thing... perhaps maybe we can test it out and mount it to the 4 for a while . Seriously though, would love to come visit your project in the coming months. If I can get away one Sat Afternoon, or Sunday, I'll let ya know.
Paul, your a much more patient person than I. When new items come I can't help myself, I have to get them open and take a look. Even though I know what is in the box I still have to look ASAP.
JohnR
RV-7A - Fuselage - SOLD, just not supposed to be
Numbers 6:24 - The LORD bless thee, and keep thee
Just let me know when you get time. You should grab CJ and do a project visit down here. You can put your plane in my hangar at POU and I'll bring you to the house.
I should have my panel painted this weekend and I'll start installing stuff next week.
I finally got the baseball schedule today, so I'll take a look and see when is a good time. At first glance I see no Sunday games, so probably on a Sunday when the weather is nice.