Leading edge fit trouble

A forum in which to discuss topics specific to the assembly of the RV 9/9A
Post Reply
jwyatt
Class G
Posts: 23
Joined: Fri Jun 29, 2007 4:12 pm
Location: Vasa, Minn.
Contact:

Leading edge fit trouble

Post by jwyatt »

Working on the wings for a 9A, making plenty of progress over the holidays, until I hit a rough patch with the leading edge. I've taken it apart & put it together three times over 2 nights, checking flange squareness, fluting, rounded the forward tabs a little more on the scotchbrite wheel, but still my problem persists:

When the left LE assembly is installed on the spar, the row of holes that attach the skin to the spar on the bottom side of the wing align perfectly. The matching row on the upper surface of the wing has the skin offset forward (up) by about 1/2 diameter, and a corresponding sizable gap between the LE skin and the main top skin. Maybe I need to step back and take a fresh look, but I just can't see anything that's wrong. The gap is consistent down the entire length of the LE.

Image Image

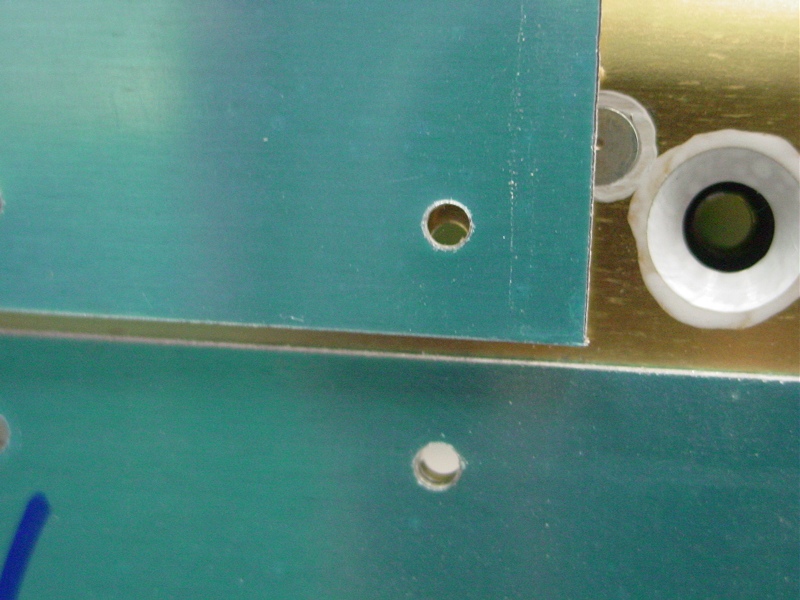
Put the right LE together to see if it had the same problem...went together fine, and lines up perfectly on the wing, so the problem is with the left assembly only. If I force it into alignment with clecoes, it bows the rib flanges inside, which can't be correct.

Image

Full log & pictures on my build log here.

Any 9 builders know the secret to this? I'm ready to move on to fuel tanks! :o

-Joshua
Joshua Wyatt | Vasa, Minn.
RV-9A N627DW @ KRGK
Flying: Phase I complete
rv9a.pacificrimsound.com

airguy
Class E
Posts: 125
Joined: Tue Feb 12, 2008 5:41 pm
Contact:

Post by airguy »

I ran into something similar, but it wasn't evenly spread along the length of the leading edge, only on one end. I finally tracked it down to the ribs on the leading edge having the aft flange not quite square, and they were not all sitting on the spar at the exact same height as a result. This caused a gap in the skin where the ribs were sitting just a hair too high. It is possible for the rib flanges to be mis-bent, leaving too much (or too little) material on the rib causing an incorrect flange height.

I ended up converting my leading edges to fuel tanks anyway, but the fix is simple enough - make sure your spar-to-rib contact points are all square, straight, and level. Don't worry about the rib flanges bowing internally, the clecoes will pull them flat again while riveting. Put clecoes in every hole, and remove one, rivet that hole, remove the next one and rivet it, etc - don't leave more than one hole open at a time, and it will be fine.
Greg Niehues
Midland, TX
RV9A - finishing - 90% done, 90% to go
http://websites.expercraft.com/airguy/
Building a 9A with too much fuel and too much engine - should drop dead any minute now. :roll:

Spike
Chief Rivet Banger
Posts: 4013
Joined: Thu Oct 14, 2004 8:40 pm
Location: Baltimore, MD
Contact:

Post by Spike »

I had the same problem. Make sure all 3 flanges are truly at 90 degrees with proper fluting. After that you just have to work it. Don't attach one whole side and then the other. Put a few clecos in on each side at a time. That will let you work it easier.

John
http://www.rivetbangers.com - Now integrating web and mail!
Current Build: 2 years into a beautiful little girl

Don Jones
Class G
Posts: 3
Joined: Fri Aug 08, 2008 10:22 am
Location: KLRU- Las Cruces, NM

Mine was the same way!

Post by Don Jones »

I had exactly the same problem. When the assembly was just clecoed together after match drilling etc., there is a gap between the wing skin and leading edge skin. After I dimpled and riveted it together the gap closed up and fits excellent.

YMMV
Don
CFII, FAASTeam representative
RV-9A Under Construction
Tail Done!
Wings Done!
Fuse Done! Working on the stinkin canopy!

jwyatt
Class G
Posts: 23
Joined: Fri Jun 29, 2007 4:12 pm
Location: Vasa, Minn.
Contact:

Post by jwyatt »

After hearing that other people had the same problem and resolved it by working the ribs in, I had another go at it, and used a method I found on another builder's website (http://www.flightinnovations.com/wings.html; about 1/3 of the way down the page). I used some scrap 2x4's and a pair of long bar clamps to help apply pressure to the aft side of the rib, pushing the holes into alignment before clecoing up the sides. This helped a great deal with the ease of clecoing the ribs into the skin, as they're definitely a tight fit. When I put it back on the wing to fit, everything lined up.

I've since done the preliminary assembly of the fuel tank ribs & skins using the same method, and both of those assemblies fit correctly the first time. Seems the secret is to do whatever is necessary to make sure the rib fits down into the skin properly, and not rely solely on the clecoes to pull it into alignment.

Thanks to all who offered suggestions & encouragement!
-Joshua
Joshua Wyatt | Vasa, Minn.
RV-9A N627DW @ KRGK
Flying: Phase I complete
rv9a.pacificrimsound.com

User avatar
smithhb
Class D
Posts: 365
Joined: Tue Oct 26, 2004 7:28 pm
Location: Blue Ridge, GA
Contact:

Post by smithhb »

Joshua,

I would be highly suspect of anything that builder at "Flight Innovations" does...

Glad it helped. I might add that the method you discovered is also featured as a tip in an issue of the RVator sometime last year.
Bret Smith
9A Flying (N16BL)
Blue Ridge, GA
http://www.FlightInnovations.com
APRS Tracking: http://www.flightinnovations.com/tracking.html

Post Reply