So I've been spending the last several weekends doing drywall work and texturing & painting my workshop. I still need to put everything back in and organize it, but this is what I ended up with:
The work area is 23' x 16'. I'm looking to start my tail kit sometime next month and was wondering what kind of table space am I going to need for it? I was told a 4' x 8' table, but I would still like to be able to get a car in there and use the lift if I need to. Ideas?
What I've been up to, recommendations?
Kelly
RV-7 Empennage done, wings done, fuselage to QB stage
1947 Stinson108-1 flying
RV-7 Empennage done, wings done, fuselage to QB stage
1947 Stinson108-1 flying
Kelly,
I think a 4'x8' table would be overkill. I am almost through the fuselage and have gotton by fantastically with the EAA standard workbench dimensions of 2' x 5' (http://www.eaa1000.av.org/technicl/work ... rktabl.htm). Actually, my bench is 30" x 66" because I put a 3" overhang around the table. After the empennage was completed, I built a second one and have them side by side for more work space. If your shop space is at a premium, put some nice rubber locking caster wheels on the legs so you can easily move it around.
Mike Bullock
http://www.rvplane.com
RV-7 | Superior IO-360 | Whirlwind 200RV
Garmin GTN650 | GRT Dual Sport SX EFIS
Status: FLYING!
http://www.rvplane.com
RV-7 | Superior IO-360 | Whirlwind 200RV
Garmin GTN650 | GRT Dual Sport SX EFIS
Status: FLYING!
I built three 3x8 tables. 4' deep is a bit much, unless it's in the center of the room you won't be able to reach the whole area.
I could have gotten by with 2 3x8 tables; one of them stays perpetually covered in junk. However, my preferred method is to have one that has tools attached to it like the drill press and bench grinder, one that I do assembly work on, and one where I prime stuff. Then I have a fourth table that my DRDT-2 lives on.
Ian
RV-7 SB, chugging toward final assembly
IO-360-C1C 200hp obtained.
Hartzell BA prop received.
James Cowl ordered.
N773WW reserved!
RV-7 SB, chugging toward final assembly
IO-360-C1C 200hp obtained.
Hartzell BA prop received.
James Cowl ordered.
N773WW reserved!
I found a 3 x 6 table to be just fine for the emp. I do have a couple of 2 x 2 tables for things like the belt sander, grinder, and band saw. My shop is only 10 x 20, so having my big table on wheels is a requirement. Keeping the top very flat is likely just as important as having it big enough, especially if you are going to clamp things to the surface while building.
Don Sinclair
CYKF
RV-7A (Fuselage)
CYKF
RV-7A (Fuselage)
Just another data point here...I built a 4x8 table to begin with, and ended up cutting it down to two 4x4's at the fuselage stage. I now only use one of the 4x4 tables as a bench, the other has been chopped in height to serve as my fuselage stand.
I have several other tables...a 3x4 (also my backrivet table), a 2x3, a 2x4, and a bench at 2x3.5, but those are mostly used for table top power tools and hardware storage.
- Cherokee Driver
- Class E
- Posts: 144
- Joined: Sun Sep 18, 2005 10:43 am
- Location: Waukesha, Wisconsin
- Contact:
Nice Job on the shop 1:1! Nothin' like dedicated building space.
Some thoughts on benches.
I agree that 4x8 is probably more than you need. Although I find that benches are stuff magnets, so there is no such thing as too much bench space. The trick is to keep things orgnized and be smart in planning. If you think you want more work surface...build multiple smaller benches.
Here are some ideas I have implimented. Build any benches you make to the same height so if you wanted to push them together... you have some flexibility.
You can also put the bench/s on wheels. Here is one of mine. There are toggle locks on the legs to secure the table when I do not want to move it. Flip up the toggles and I can move the bench heavily loaded, with two fingers. I find it handy to be able to move things around when the job changes. When you want the benches out of the way...roll em against the wall.
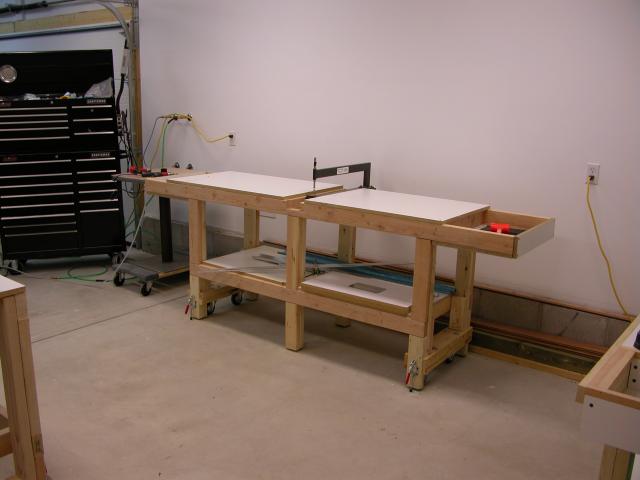
This is the EAA model with some changes. I built the center to allow for a drop in C- frame. When I am not "C-framing" out it comes and it is replaced with an appropriately sized insert.
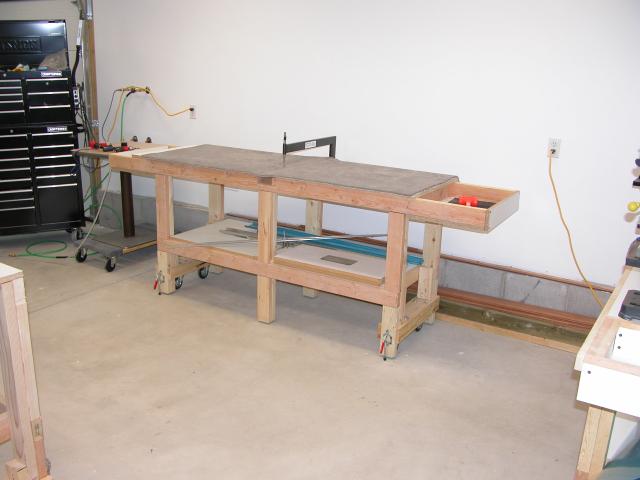
I also like building these with little tool tray extensions on the ends. This way your hand tools are below the work surface and out of the way. Here it is with the carpet cover.
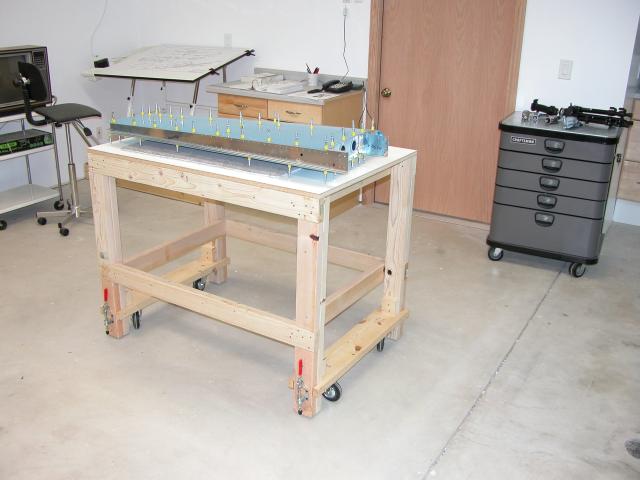
Below: I also built a rolling bench without the trays. This one is nice for assembly. It is about 3x4 and is the same height as all of my other benches. Also on wheels.
Just some other ideas that you might find useful. Good luck.
CD
RV-8A
Wing Kit (Slow Build...very slow build)
Home of "Skunk Works, Wisconsin Branch"
"Glacial Pace...but lovin every minute of it!"
Wing Kit (Slow Build...very slow build)
Home of "Skunk Works, Wisconsin Branch"
"Glacial Pace...but lovin every minute of it!"
Thanks for the tips and links, everyone! There's just about 3' between the right post of the lift and the wall, so a 2-2.5' wide table would be ideal for being able to fit through there. I had seen the integrated C-frame somewhere and really like the idea, so that will definately happen. I'm really trying to get to a good starting point before I even get the tail kit, otherwise, I'll just start putting it together right when I get it, even if the concrete is my work surface
OK, so maybe I wouldn't QUITE do that, but I think if it came down to building an airplane or a workbench, the airplane would win until I just couldn't get any further without the workbench
Kelly
RV-7 Empennage done, wings done, fuselage to QB stage
1947 Stinson108-1 flying
RV-7 Empennage done, wings done, fuselage to QB stage
1947 Stinson108-1 flying