Status Brantel #72823
Since it seems to be quiet around here I thought I would update on what I am working on...
Fitting the cowl at this point. I have one of the Pepto Pink ones and just in case your wondering, it is not any better than the older ones. Matter of fact, it might be worse as far as things like:
The surface is pretty bad. Each low spot between the weave of the honeycomb has voids in it.
They no longer mold the flange or a scribe line on either the top or the bottom half so you have to guess at where to start trimming.
The lower half outboard inlet areas have about an inch too much material that must be cut just to get the center section to meet and be round. This leaves you scared to death that your cutting too much around the outside of the inlets and sides. It would be super easy to mess this up bad!
Tonight I plan on continuing to fit the bottom to the top.
Other than that, on the side I have been helping Aeroelectric Bob get his new filtered LED driver on the market. That thing seems to help the issues that I had with the driver and RF noise.
What the heck are all of you guys working on lately?
Brantel (Brian Chesteen),
RV12-IS, #121606, N912BC - Building Now!
RV10, #41942, N????? - Project Sold
RV-7/TU, #72823, N159SB - SOLD
RV12-IS, #121606, N912BC - Building Now!
RV10, #41942, N????? - Project Sold
RV-7/TU, #72823, N159SB - SOLD

Brian-
I had the Sam James cowl and that was a pain in the @ss to fit also. I found the cowl worse to deal with than the canopy. I have my cowl totally fit to the fuselage but it still needs some finish work before I call her done.
As far as what I'm working on, I just got back from a 2 week work sponsored vacation to Europe. Nothing like having someone else pay for Oktoberfest for only having to do one official day of work over 14 days abroad!.
I am working on a number of things on my project - painting the canopy frame for the last time before I put the canopy on it and glass it in, modifying the cowl for the precision fuel controller, shopping for wiring tools (strippers, crimpers, etc), and waiting for my dual GRT Sport EFIS's to ship next week. I think once I get past the cowl issues and the canopy glassed I will really start flying on the progress on my bird.
Thanks a lot for spearheading the LED driver issue. I fully expect to purchase a pair of the units from Bob.
Mike Bullock
http://www.rvplane.com
RV-7 | Superior IO-360 | Whirlwind 200RV
Garmin GTN650 | GRT Dual Sport SX EFIS
Status: FLYING!
http://www.rvplane.com
RV-7 | Superior IO-360 | Whirlwind 200RV
Garmin GTN650 | GRT Dual Sport SX EFIS
Status: FLYING!

How I fitted my Pepto Pink Cowl
Not much info on here relating to the new Pepto Pink Cowl and its differences with the older ones so I will post pics of how one man is fitting his. I am using the tried and true hinges all around. Cheap and it works!
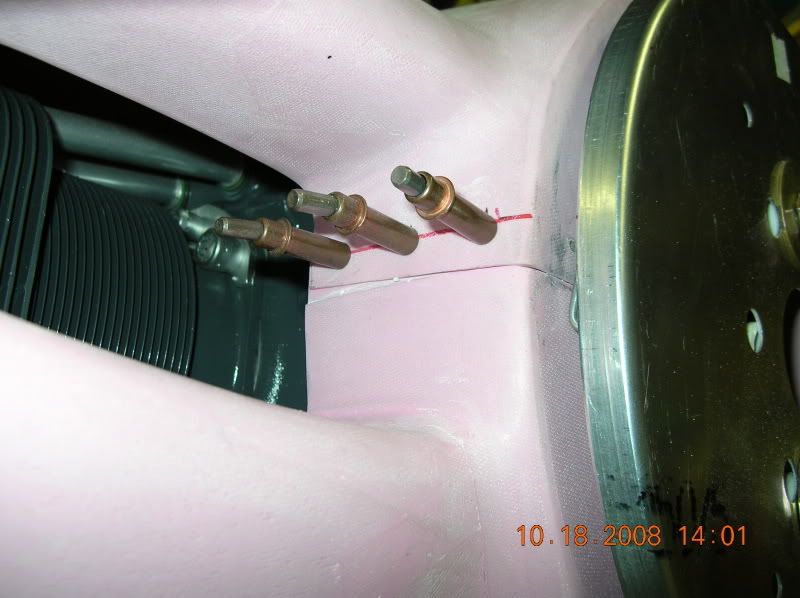
First I had to simulate the prop spacer I do not have yet so I picked up some 3" 1/2-20 fine threaded bolts from the hardware store. Along with the large spinner washers that come in the finish kit, I used these to attach the spinner backplate.

I cut some PVC pipe to make the 2-1/4" spacers. I am going to have a fixed pitch prop. It is my understanding that if your using a CS prop, you need a different length spacer.

I then used a couple old paper back books as a spacer for getting the top of the cowl aligned with the spinner. I just kept taking pages from the book and fitting the top cowl till the spacing was correct.

I then cut and drilled the hinges for the top. I spaced them right at the edge of the edge distance requirement for the holes in order to hide as much of the gap as possible between the cowl and the firewall area skins.


I drew a line 2" back from the front edge of the firewall skins, set my spinner to cowl gap at 1/8" and then marked the line onto the top aft side of the cowl. I then cut the top aft end to this mark.

Once this was fitting nice, I set the gap at 1/4" at the front and sanded in a 1/16" gap at the back for paint. I used a 16" long board with 60 grit glued to it for the sanding to ensure a nice straight edge.

First I had to simulate the prop spacer I do not have yet so I picked up some 3" 1/2-20 fine threaded bolts from the hardware store. Along with the large spinner washers that come in the finish kit, I used these to attach the spinner backplate.
I cut some PVC pipe to make the 2-1/4" spacers. I am going to have a fixed pitch prop. It is my understanding that if your using a CS prop, you need a different length spacer.
I then used a couple old paper back books as a spacer for getting the top of the cowl aligned with the spinner. I just kept taking pages from the book and fitting the top cowl till the spacing was correct.
I then cut and drilled the hinges for the top. I spaced them right at the edge of the edge distance requirement for the holes in order to hide as much of the gap as possible between the cowl and the firewall area skins.
I drew a line 2" back from the front edge of the firewall skins, set my spinner to cowl gap at 1/8" and then marked the line onto the top aft side of the cowl. I then cut the top aft end to this mark.
Once this was fitting nice, I set the gap at 1/4" at the front and sanded in a 1/16" gap at the back for paint. I used a 16" long board with 60 grit glued to it for the sanding to ensure a nice straight edge.
Last edited by Brantel on Tue Oct 14, 2008 7:44 am, edited 1 time in total.
Brantel (Brian Chesteen),
RV12-IS, #121606, N912BC - Building Now!
RV10, #41942, N????? - Project Sold
RV-7/TU, #72823, N159SB - SOLD
RV12-IS, #121606, N912BC - Building Now!
RV10, #41942, N????? - Project Sold
RV-7/TU, #72823, N159SB - SOLD
I have the typical problem of fits nice a the top but runs away at the center.....Will require building out later....

The spinner is fitting pretty concentric to the cowl at this point.

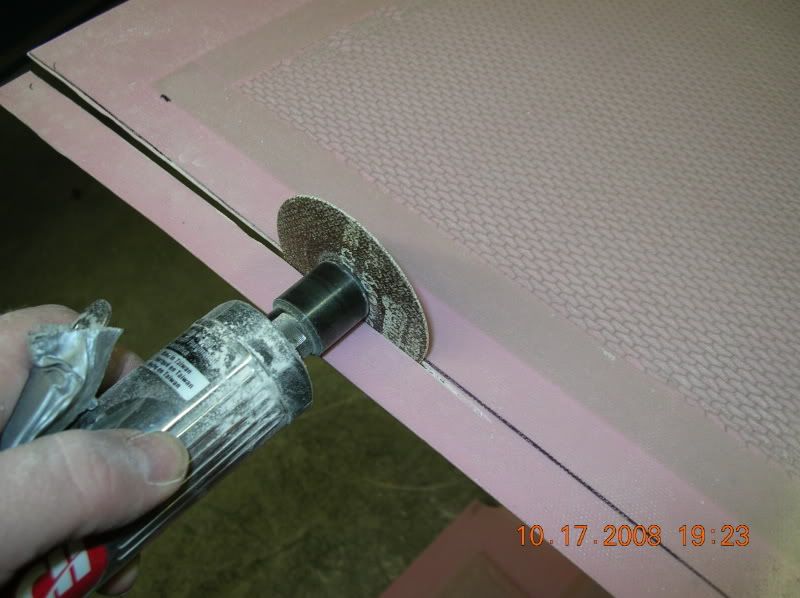
Next I moved on to getting the nose to fit together and round.
I took a Dremel and sanding drum and cleaned up the inside of the top at the overlap areas.


I also took a file and cleaned up the molded in flanges at the center of the bottom at the overlap areas.
In order for the two to go together, I had to mark a line so I would know how to cut the outsides of the inlets on the bottom cowl. I put a straight edge on the molded in flanges of the center of the bottom half and extended this line out to the outside of the inlets. I cut this off at that point but just to outside of the curve because I did not want to cut any off the sides at this point.


The spinner is fitting pretty concentric to the cowl at this point.
Next I moved on to getting the nose to fit together and round.
I took a Dremel and sanding drum and cleaned up the inside of the top at the overlap areas.
I also took a file and cleaned up the molded in flanges at the center of the bottom at the overlap areas.
In order for the two to go together, I had to mark a line so I would know how to cut the outsides of the inlets on the bottom cowl. I put a straight edge on the molded in flanges of the center of the bottom half and extended this line out to the outside of the inlets. I cut this off at that point but just to outside of the curve because I did not want to cut any off the sides at this point.
Brantel (Brian Chesteen),
RV12-IS, #121606, N912BC - Building Now!
RV10, #41942, N????? - Project Sold
RV-7/TU, #72823, N159SB - SOLD
RV12-IS, #121606, N912BC - Building Now!
RV10, #41942, N????? - Project Sold
RV-7/TU, #72823, N159SB - SOLD
I was then able to get the two halves together pretty nice at the front. It will require some tweaking to get the seams perfect but so far so good. I did not want to drill any side holes yet so I just joined them with a temporary hole at the front. This holds them together and pulls them into each other. Problem with this is that the clecos will hit either the spinner backplate or the starter gear/flywheel.

Once this was done, I hoisted the bottom up into place the best I could using a strap and a bungee cord or two. The goal was to get it close enough to know where to cut for the gear legs.

I then marked a cuttout on both sides of the bottom for the gear leg clearances...

And cut them out..They will need opened up more for brake lines etc. later.


Once this was done, I hoisted the bottom up into place the best I could using a strap and a bungee cord or two. The goal was to get it close enough to know where to cut for the gear legs.
I then marked a cuttout on both sides of the bottom for the gear leg clearances...
And cut them out..They will need opened up more for brake lines etc. later.
Brantel (Brian Chesteen),
RV12-IS, #121606, N912BC - Building Now!
RV10, #41942, N????? - Project Sold
RV-7/TU, #72823, N159SB - SOLD
RV12-IS, #121606, N912BC - Building Now!
RV10, #41942, N????? - Project Sold
RV-7/TU, #72823, N159SB - SOLD
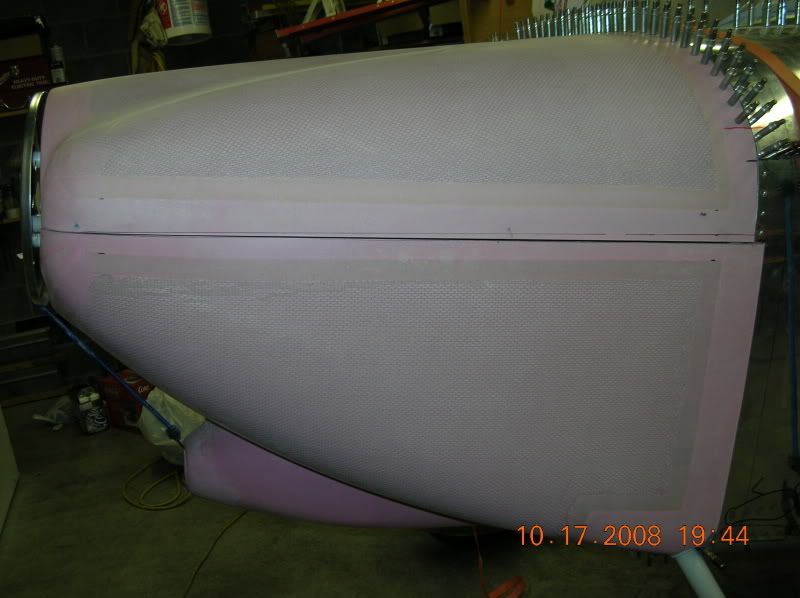
With that done, I was able to pull the bottom up into place to meet the top.
I just let the sides overlap the firewall and the top cowl all around. The front was able to be pulled into position. I used a strap and a bungee to hold it in place.
The fit at the outsides of the inlets at the seam don't look too bad at this point. Should get even better once the sides are not overlapping each other....


This will take some fill work to build it out even. At this point once I set the 1/16" paint gap at the back, it has about a 5/16" gap at the top. I do not want it any closer because that makes the top hard to get on and off later. As you can see the front is not molded properly.

I just let the sides overlap the firewall and the top cowl all around. The front was able to be pulled into position. I used a strap and a bungee to hold it in place.
The fit at the outsides of the inlets at the seam don't look too bad at this point. Should get even better once the sides are not overlapping each other....
This will take some fill work to build it out even. At this point once I set the 1/16" paint gap at the back, it has about a 5/16" gap at the top. I do not want it any closer because that makes the top hard to get on and off later. As you can see the front is not molded properly.
Brantel (Brian Chesteen),
RV12-IS, #121606, N912BC - Building Now!
RV10, #41942, N????? - Project Sold
RV-7/TU, #72823, N159SB - SOLD
RV12-IS, #121606, N912BC - Building Now!
RV10, #41942, N????? - Project Sold
RV-7/TU, #72823, N159SB - SOLD
-
Spike
- Chief Rivet Banger
- Posts: 4013
- Joined: Thu Oct 14, 2004 8:40 pm
- Location: Baltimore, MD
- Contact:
Keep that info coming!
http://www.rivetbangers.com - Now integrating web and mail!
Current Build: 2 years into a beautiful little girl
Current Build: 2 years into a beautiful little girl
Today I worked on getting the top drilled to the hinges and worked on the fit of the bottom.
I ensured that I had the top exactly where I wanted it and proceeded to drill the top hinges. I left ~1/16 gap for paint. I started in the middle and worked down the sides.
I think when I rivet the hinges on, I will put some flat strip stock in to hide the gaps where there is no hinge material. I think this will loook better and camouflage those areas once it is painted.


I then lifted the bottom up into place and ensured a nice fit to the top and then marked for the bottom trim line and the bottom hinges.
I cut the bottom from the sides just up to the radius of the exhaust outlet area. I will leave that part long till later.

I then drilled and clecoed the bottom hinges. Put the bottom back on and drilled and clecoed the hinge to the bottom cowl.
Like all the other hinges I have drilled, I am going to the limit on edge distance on the holes in an effort to hide the eylets of the hinge behind the glass. This little stickout seems to do that quite well.


Next session I will work on the horizontal fit between the two halves. I will not cut the overlap off of the bottom sides where they overlap the fuse till I have the horizontal hinge installed.
To be continued....
I ensured that I had the top exactly where I wanted it and proceeded to drill the top hinges. I left ~1/16 gap for paint. I started in the middle and worked down the sides.
I think when I rivet the hinges on, I will put some flat strip stock in to hide the gaps where there is no hinge material. I think this will loook better and camouflage those areas once it is painted.
I then lifted the bottom up into place and ensured a nice fit to the top and then marked for the bottom trim line and the bottom hinges.
I cut the bottom from the sides just up to the radius of the exhaust outlet area. I will leave that part long till later.
I then drilled and clecoed the bottom hinges. Put the bottom back on and drilled and clecoed the hinge to the bottom cowl.
Like all the other hinges I have drilled, I am going to the limit on edge distance on the holes in an effort to hide the eylets of the hinge behind the glass. This little stickout seems to do that quite well.
Next session I will work on the horizontal fit between the two halves. I will not cut the overlap off of the bottom sides where they overlap the fuse till I have the horizontal hinge installed.
To be continued....
Brantel (Brian Chesteen),
RV12-IS, #121606, N912BC - Building Now!
RV10, #41942, N????? - Project Sold
RV-7/TU, #72823, N159SB - SOLD
RV12-IS, #121606, N912BC - Building Now!
RV10, #41942, N????? - Project Sold
RV-7/TU, #72823, N159SB - SOLD

Brian-
I am AMAZED at the progress you have made on the cowl in just two nights! I think it took me a good two weeks of work to get my cowl to the point where you are at now....although a number of those nights were spent having a starring contest with the cowl.
It's nice to see someone else using hinges in a world where everyone seems to be on the camlock kick.
I did end up using camlocks on the bottom of the cowl because I had concerns about removing the bottom hinge pins if I just turned off the engine and the exhaust was hot. I don't know if you have considered that, but I thought I would speak up now. I also used a camlock on the front to hold the two halves together. I think it's going to looks great when it's done.
Mike Bullock
http://www.rvplane.com
RV-7 | Superior IO-360 | Whirlwind 200RV
Garmin GTN650 | GRT Dual Sport SX EFIS
Status: FLYING!
http://www.rvplane.com
RV-7 | Superior IO-360 | Whirlwind 200RV
Garmin GTN650 | GRT Dual Sport SX EFIS
Status: FLYING!
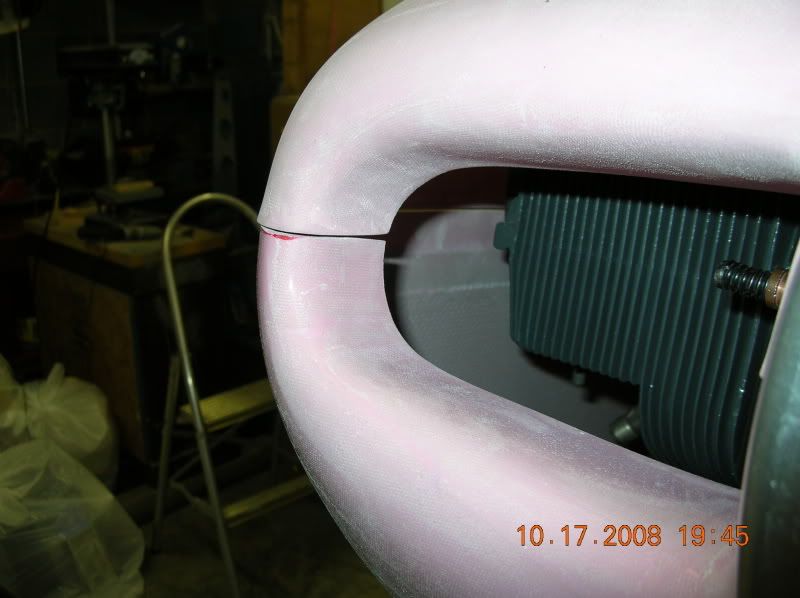
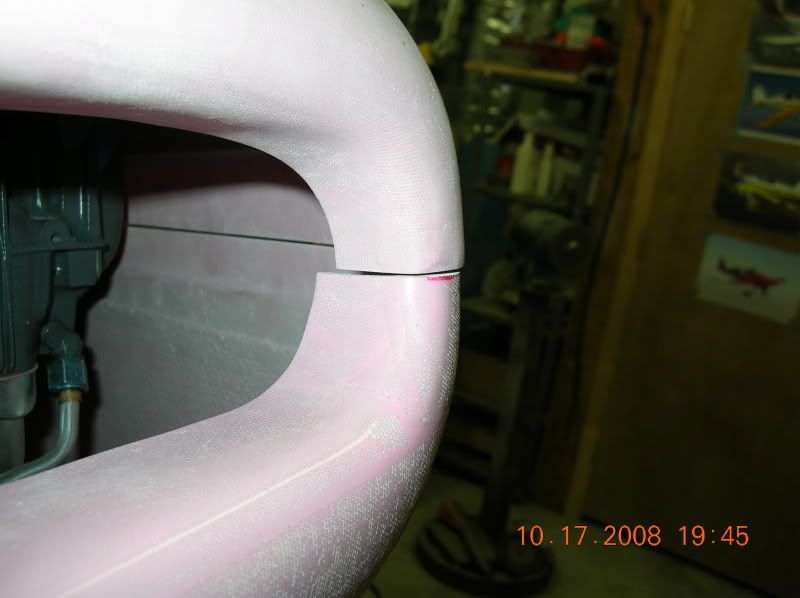
Yesturday I got started trimming the lower cowl to fit the upper one. Out of the box, the upper cowl's outer lower edge seems to be where they intended the split line to be.
I sanded the upper cowl's edge straight using a very long sanding block.
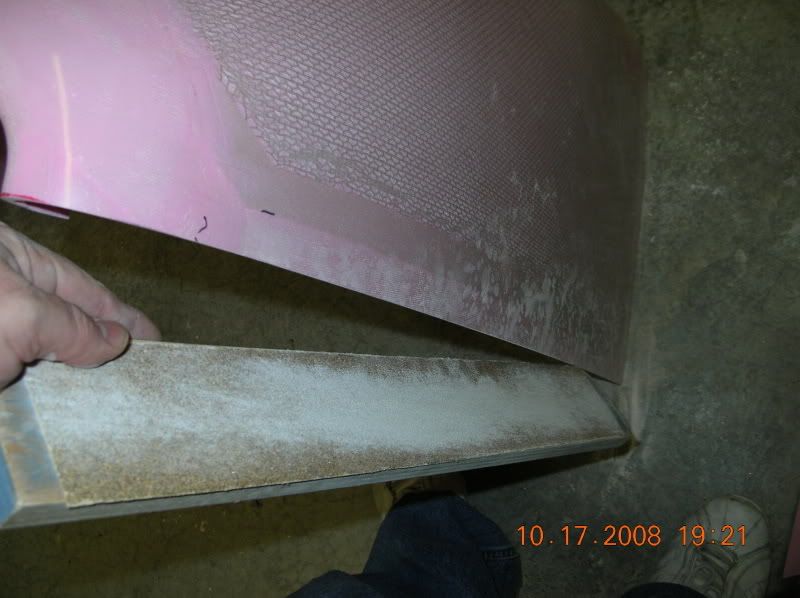
Then I put it all back on the plane and marked the cut line on the bottom cowl that was underlapped by the top.
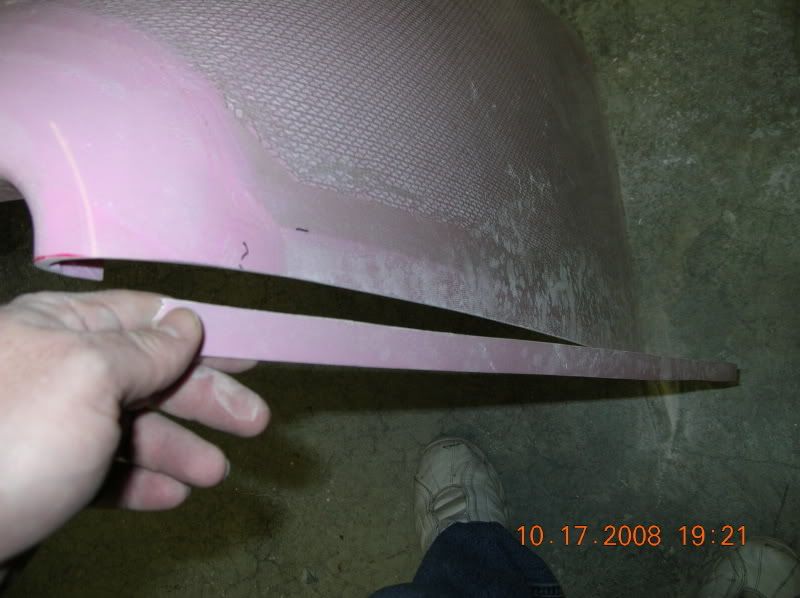
Put it all back together to check the fit. I sanded the bottoms edge straight with the long block.

Now you can finally see how the areas around the outsides of the inlets are going to fit. These are pretty good. Just a small amount of filler will make them nice.
I sanded the upper cowl's edge straight using a very long sanding block.
Then I put it all back on the plane and marked the cut line on the bottom cowl that was underlapped by the top.
Put it all back together to check the fit. I sanded the bottoms edge straight with the long block.
Now you can finally see how the areas around the outsides of the inlets are going to fit. These are pretty good. Just a small amount of filler will make them nice.
Brantel (Brian Chesteen),
RV12-IS, #121606, N912BC - Building Now!
RV10, #41942, N????? - Project Sold
RV-7/TU, #72823, N159SB - SOLD
RV12-IS, #121606, N912BC - Building Now!
RV10, #41942, N????? - Project Sold
RV-7/TU, #72823, N159SB - SOLD
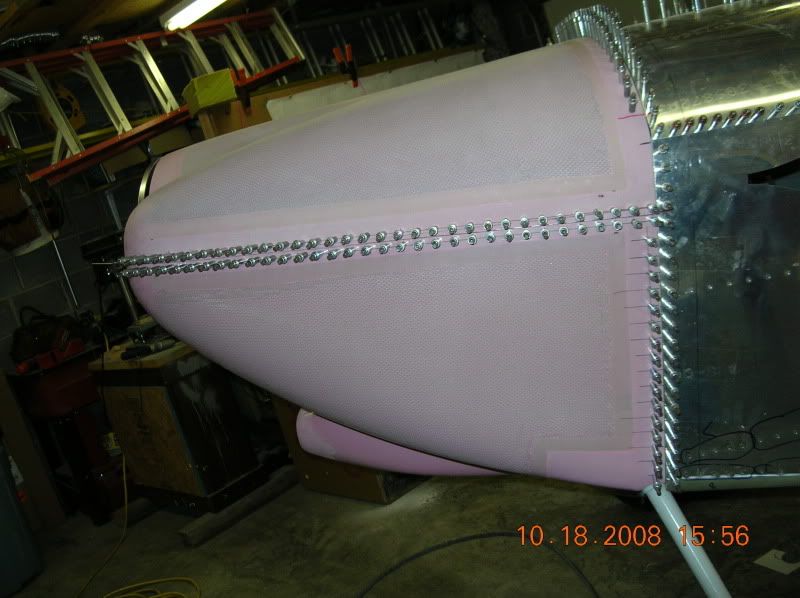
Today I got started with the hinges...
Followed the plans to a T here. Let it ride up at the back. Watch the edge distance on your hinge!
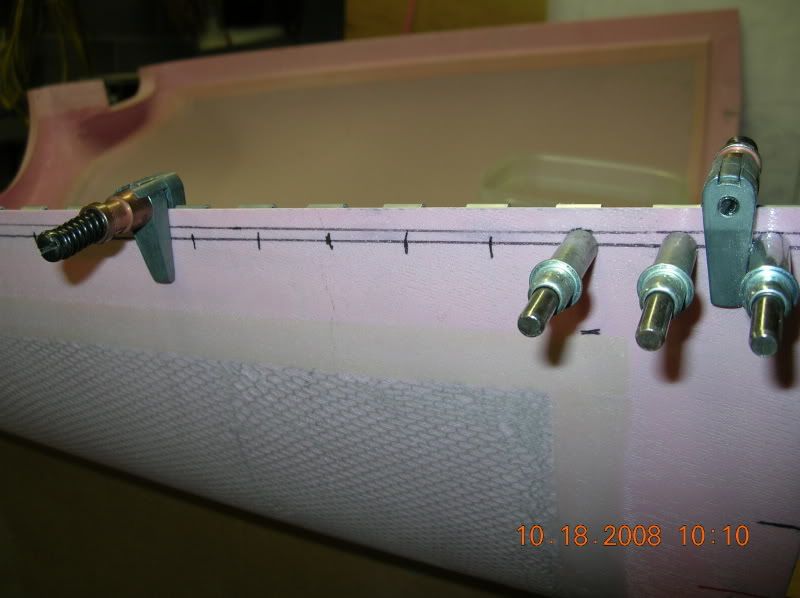
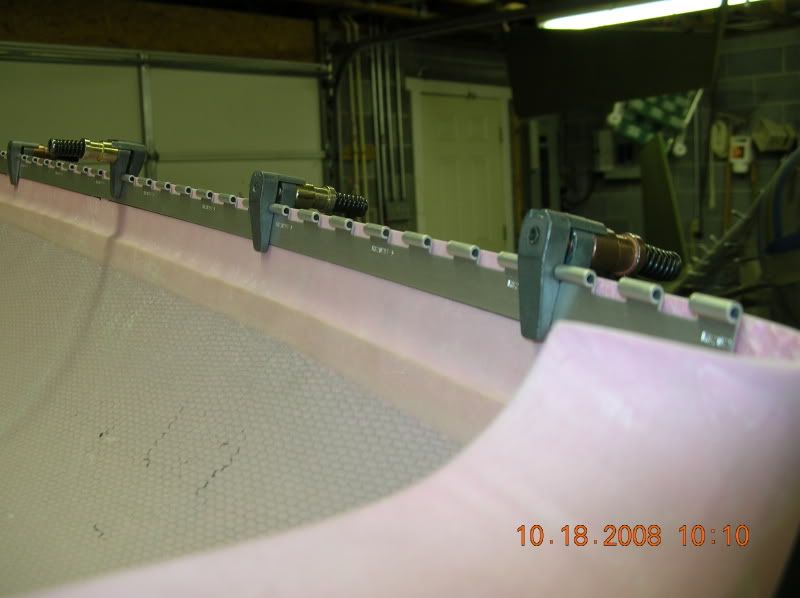

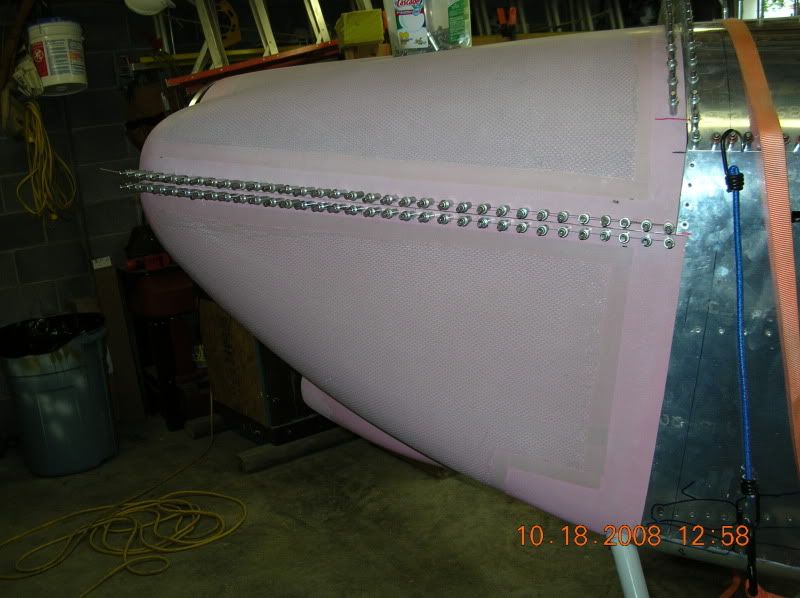
Next I marked and drilled the three screw holes for the center/inlet area.
Followed the plans to a T here. Let it ride up at the back. Watch the edge distance on your hinge!
Next I marked and drilled the three screw holes for the center/inlet area.
Brantel (Brian Chesteen),
RV12-IS, #121606, N912BC - Building Now!
RV10, #41942, N????? - Project Sold
RV-7/TU, #72823, N159SB - SOLD
RV12-IS, #121606, N912BC - Building Now!
RV10, #41942, N????? - Project Sold
RV-7/TU, #72823, N159SB - SOLD
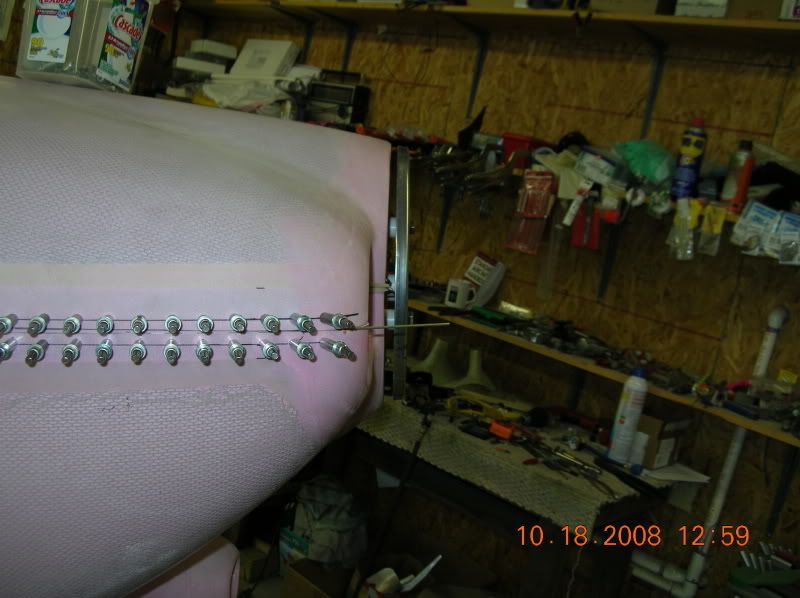
Then I marked, cut, and sanded the aft sides of the bottom to the firewall. Used packing tape to hold the hinge straight for drilling.
Once the side was cut and I had a paint line relief sanded in, I marked and drilled the aft side hinges on the bottom.
And thats about it! I call the fitting complete on this cowl!
Just a little more cosmetic work to do and after riveting on the hinges, I get to do several hours of pinhole filling!
I started on this a couple hours Monday night and worked on it a couple hours each Tuesday and Friday evening and about 5 hours today to get to this point.

If your following this, good luck with yours and your results may vary
Once the side was cut and I had a paint line relief sanded in, I marked and drilled the aft side hinges on the bottom.
And thats about it! I call the fitting complete on this cowl!
Just a little more cosmetic work to do and after riveting on the hinges, I get to do several hours of pinhole filling!
I started on this a couple hours Monday night and worked on it a couple hours each Tuesday and Friday evening and about 5 hours today to get to this point.
If your following this, good luck with yours and your results may vary
Brantel (Brian Chesteen),
RV12-IS, #121606, N912BC - Building Now!
RV10, #41942, N????? - Project Sold
RV-7/TU, #72823, N159SB - SOLD
RV12-IS, #121606, N912BC - Building Now!
RV10, #41942, N????? - Project Sold
RV-7/TU, #72823, N159SB - SOLD
-
aparchment

- Class C
- Posts: 522
- Joined: Tue Nov 15, 2005 9:43 pm
ugly cowl
Brian:
You are doing great on the cowl. Thanks for the tips.
I don't know how you stand the pink though. I think I will have to spray a cover coat of primer just so I don't have to look at Pepto pink every day.
Antony
You are doing great on the cowl. Thanks for the tips.
I don't know how you stand the pink though. I think I will have to spray a cover coat of primer just so I don't have to look at Pepto pink every day.
Antony

Brian,
This is AWESOME! I'm very impressed with the speed and the quality of your work. It must really feel good to see the final lines and curves of your airplane taking shape. Thanks for posting all the pics and detailing your methods for those of us who are behind you.
Right now, I'm working on bulkheads for my fuselage.
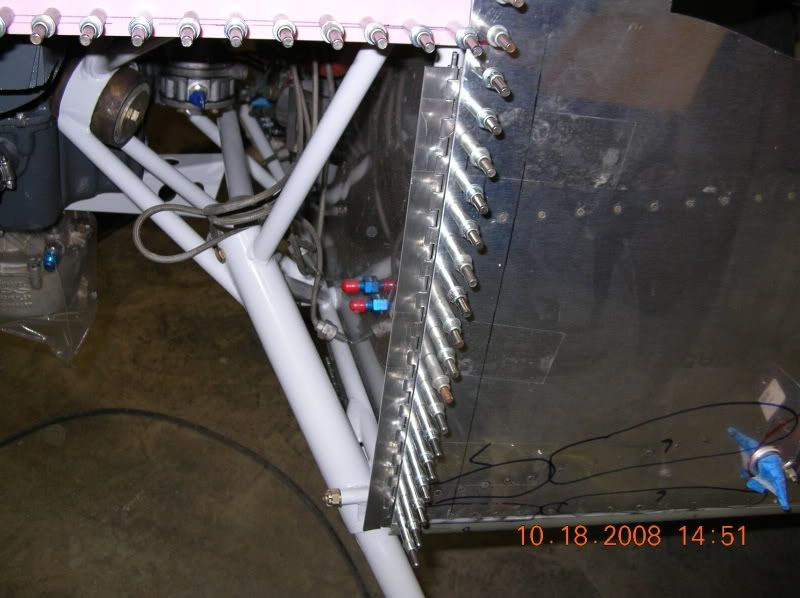
Last evening, I riveted the hinges to the firewall on the sides and bottoms. Top will be staying clecoed till I am ready to rivet the top forward skin on for good. Had to use a few blind rivets because of the engine mount. I made a special extension die for the 4" no hole yoke I had by cutting the head off of a hex head bolt. Tapped it to the no hole for clearance around the eyes of the hinges. The bottom three on the sides and the outboard one on the bottom had to have blinds. I used MK319-BS on all but the bottom hole on the sides. Here I used a CS4-4 because of the extra grip length needed. Most say rivet these on before the engine mount goes on but I don't know how you can do this without fitting the cowl first to know where to end the hinges on the side.
Next is countersinking about a million holes in the cowl and epoxy/flox/rivet the hinges on the fiberglass parts.
I just ordered my baffle and airbox kit so I will work on the oil door until those get here. Plan to make that per the prints for simplicity and low cost.
Think I will do the airbox first so I can call the cowl complete when it is done. Have to fiberglass the inlet extension to the airbox....
Baffles should be fun glad I have a few Polish blue prints around here to look at!
Next is countersinking about a million holes in the cowl and epoxy/flox/rivet the hinges on the fiberglass parts.
I just ordered my baffle and airbox kit so I will work on the oil door until those get here. Plan to make that per the prints for simplicity and low cost.
Think I will do the airbox first so I can call the cowl complete when it is done. Have to fiberglass the inlet extension to the airbox....
Baffles should be fun
Brantel (Brian Chesteen),
RV12-IS, #121606, N912BC - Building Now!
RV10, #41942, N????? - Project Sold
RV-7/TU, #72823, N159SB - SOLD
RV12-IS, #121606, N912BC - Building Now!
RV10, #41942, N????? - Project Sold
RV-7/TU, #72823, N159SB - SOLD