Status Brantel #72823

A forum in which to discuss topics specific to the assembly of the RV 7/7A.
Post Reply
User avatar
Brantel
Class B
Posts: 1030
Joined: Wed Aug 30, 2006 3:23 pm
Location: Newport, TN

Post by Brantel »

Been working on baffles lately.....

A few days ago I completed the oil door install. Since I am poor and trying to save for avionics, I went standard Vans on the hinge and the fasteners. Cheap, works and does not look that bad!

Image

Image

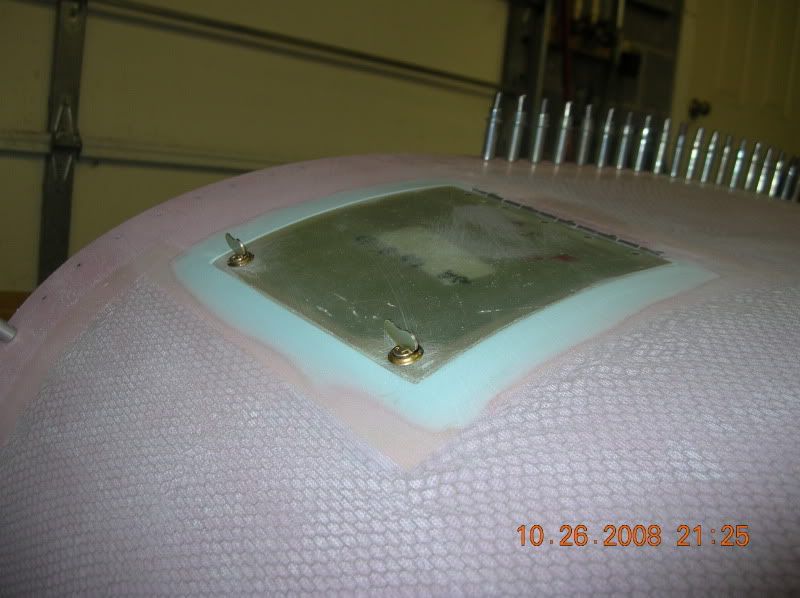
I cut the door undersize to get it down on the flat part of the molded in recess and then used packing tape and Superfill to fill and fair in the door. Looks pretty good.

This gave me a square edge around the door opening which looks much better. Not sure why Van's does not mold the recess with square edges instead of radiused ones.

If I had it to do over, I would not cut the hole in the cowl until after I had the door sized. I still have a nice flange around under the door but it was close on the camlocks.
Brantel (Brian Chesteen),
RV12-IS, #121606, N912BC - Building Now!
RV10, #41942, N????? - Project Sold
RV-7/TU, #72823, N159SB - SOLD

weezbad
Class C
Posts: 528
Joined: Sun Oct 21, 2007 9:00 pm
Location: darlington s.c.

Post by weezbad »

looks just like mine less the stffeners i put on the back of mine. i hear they door will bulge in flight w/o them.
william....don't let it beat you down, you are stronger than you think.

User avatar
TomNativeNewYorker
Class D
Posts: 439
Joined: Tue Mar 21, 2006 9:19 pm
Location: KSAV

Post by TomNativeNewYorker »

Brantel wrote: This gave me a square edge around the door opening which looks much better. Not sure why Van's does not mold the recess with square edges instead of radiused ones.
I dont know if this relates, but when I was going to aircraft structural/sheetmetal training, we were taught to radius everything. They told us that sharp corners is a concentration point for stresses leading to stress corrosion cracking.

User avatar
TomNativeNewYorker
Class D
Posts: 439
Joined: Tue Mar 21, 2006 9:19 pm
Location: KSAV

Post by TomNativeNewYorker »

Her is a little stress corrosion from the corrosion book I can not name here.

3-9.9. STRESS CORROSION.

Also called stress corrosion cracking (SCC). Stress corrosion is the intergranular or transgranular cracking of a metal caused by the combined effects of constant tensile stress (internal or applied) and corrosion. Internal or residual stresses may be produced by welding, cold working, forming, and heat treatment operations during the manufacture of a part. Stresses remain concealed in the part unless stress relief operations are used. Other hidden stresses are induced in parts when press or shrink fits are used and when slightly mismatched parts are clamped together with rivets and bolts. All these stresses add to those caused by applying normal loads to parts in operation. Stress corrosion is normally localized and appears in the form of cracks. During SCC, the metal is unattacked over most of its surface, while fine cracks progress through the interior of the part. Cracking is generally perpendicular to the applied stress. Metals have threshold stresses below which stress corrosion cracking will not occur. This threshold stress varies from metal to metal, is different for different tempers of the same metal, and is different for each of the three directions in which stress can be applied. In aircraft, high strength steel parts
(e. g. landing gear) and high strength aluminum parts are particularly susceptible to stress corrosion.

3-9.9.1. Associated Hazards.

Stress corrosion cracking is an extremely dangerous type of failure because it can occur at stress levels far below the rated strength of a metal, starting from what appears to be a very minor corrosion pit. This type of failure can be catastrophic and occur without warning. Parts can completely sever in a split second or they can crack slowly. The rate of cracking and the stress limit is very unpredictable in operating service. For example, 7075-T6 aluminum alloy can fail by stress corrosion cracking when subjected to a stress which is only 10% of its rated strength.

3-9.9.2. Causes.

Specific environments have been identified which cause stress corrosion cracking of certain alloys. Salt solutions, sea water, and moist salt laden air may cause stress corrosion cracking of heat treatable aluminum alloys, stainless steels, and some titanium alloys. Magnesium alloys may stress corrode in moist air. Stress corrosion can be prevented by placing an insulating barrier between the metal and the corrosive environment, or by applying protective coatings and/or water displacing corrosion preventive compounds. Stress relief operations during fabrication of parts will help, because it lowers the internal stress level of the part. Shot peening a metal increases resistance to stress corrosion cracking by creating compressive stresses on the surface, which must be overcome by an applied tensile stress before the surface sees any tension load. Changing the alloy (for example, replacing an aluminum 7075-T6 part with one made from 7075-T73 or –T76 alloy) can greatly increase resistance to SCC.

weezbad
Class C
Posts: 528
Joined: Sun Oct 21, 2007 9:00 pm
Location: darlington s.c.

Post by weezbad »

yeah but......IMHO

this is a fiberglass part that is radiused in its original design and only cosmetically made with sharp edges. the component that is sharp edged is a non structural component and will not likely change the stress risers if there is any...
william....don't let it beat you down, you are stronger than you think.

User avatar
Brantel
Class B
Posts: 1030
Joined: Wed Aug 30, 2006 3:23 pm
Location: Newport, TN

Post by Brantel »

Been working on baffles. I have the new latest and greatest redesigned baffle kit from Vans... It has been some work trimming it to fit my narrow deck engine. There are more fillets, bosses and areas of reinforcement on the narrow deck which interfear with the cutouts for the engine.

Anyway, I have most of it on there at this point and the lower cowl fitting up to the intake areas. Lots more work to do before these are finished. I am just taking my time and making small trims here and there to get it to fit.

Image

Image

Image
Brantel (Brian Chesteen),
RV12-IS, #121606, N912BC - Building Now!
RV10, #41942, N????? - Project Sold
RV-7/TU, #72823, N159SB - SOLD

User avatar
Brantel
Class B
Posts: 1030
Joined: Wed Aug 30, 2006 3:23 pm
Location: Newport, TN

Post by Brantel »

Here is the time eating details that I have been working on the past few weeks.

I finished up the baffles less the seal at the top:

!Image

Image

Image

Built this little pain in the rear, those that have not made this yet and are using a vertical induction, just go ahead and order you some stock to make the carb mount plate out of because you will need to shift the airbox over to the co-pilot side to prevent the box from hitting the cowl scoop when it shakes.....:

Image

Finished epoxying and riveting the hinges to the top cowl and made this little extension to the inlet. This does not look like much but it is a ton of work!

Image
Brantel (Brian Chesteen),
RV12-IS, #121606, N912BC - Building Now!
RV10, #41942, N????? - Project Sold
RV-7/TU, #72823, N159SB - SOLD

User avatar
Brantel
Class B
Posts: 1030
Joined: Wed Aug 30, 2006 3:23 pm
Location: Newport, TN

Post by Brantel »

I have been building my replacement "Larger" rudder lately...

Secured myself a hangar and moved the wings there this weekend....

Hangars are hard to come by at my home airport...An opportunity came up for me to get one even though I am not really ready for one yet and I decided that I better grab it while I can. Not looking forward to paying $220 a month for an old "T" hangar that I don't really need right now but the airplane will eventually need a home and when I really need one, most likely there would not be one available.

If my job faulters, I can always give it up I suppose...

Image

Image
Brantel (Brian Chesteen),
RV12-IS, #121606, N912BC - Building Now!
RV10, #41942, N????? - Project Sold
RV-7/TU, #72823, N159SB - SOLD

User avatar
Brantel
Class B
Posts: 1030
Joined: Wed Aug 30, 2006 3:23 pm
Location: Newport, TN

Post by Brantel »

About to wrap up the replacement larger rudder project. It seems so long ago since I built the original (about 10 years ago!). Learn something new everyday. This newer trailing edge design is greek to me.

I pro-sealed it up and cleco'd it to a piece of angle. I will wait a few days before trying my hand at double flush rivets.....

Image

Anyway, today I worked on fitting the emp fairing. This is the stock fairing and I must be the luckiest person on Earth because this thing actually fits! All I did was cut it at the scribe line and drill it to the emp!

I was shocked since most people hate this thing!

Image

Image

Image

Image

Image

Image

Image

Image
Brantel (Brian Chesteen),
RV12-IS, #121606, N912BC - Building Now!
RV10, #41942, N????? - Project Sold
RV-7/TU, #72823, N159SB - SOLD

User avatar
bullojm1
Chief Rivet Banger
Posts: 1374
Joined: Sat Mar 25, 2006 6:37 pm
Location: KDMW
Contact:

Post by bullojm1 »

Hey Brian-

Congrats on the empennage fairing fitting right out of the box. I hope I get the same luck!

I noticed you clecoed on some angle to keep your rudder trailing edge straight. Good! When I went to my builders workshop, Tom Emery recommended after the proseal dries to open up every other hole on the angle to at least the size of a squeezer die. The idea is to leave the angle clecoed to the trailing edge and squeeze every other rivet (i.e set it before you backrivet it). From what Tom said, even prosealed the trailing edge can still walk a little. Leaving the angle on as long as possible and setting half of the rivets will guarantee it being straight.

My log to depict this is at http://rvplane.com/?categoryid=2&dayid=101
Mike Bullock
http://www.rvplane.com
RV-7 | Superior IO-360 | Whirlwind 200RV
Garmin GTN650 | GRT Dual Sport SX EFIS
Status: FLYING!

User avatar
Brantel
Class B
Posts: 1030
Joined: Wed Aug 30, 2006 3:23 pm
Location: Newport, TN

Panel In Progress!

Post by Brantel »

The panel cutting is complete.

I would have loved to have this thing laser or water jet cut but since I am on the frugal build plan, I decided to cut it myself by hand.

Used the original panel as a template to make a new panel stock + 1.5" tall. Used Autocad to layout a full size template and then center punched all the corners and spotted the component holes. I am unsure about the diameter needed for some things so I just drilled a pilot hole in those places.

I decided I wanted a different switch type for the elevator trim and the one that comes with the servo fit the bill. It has a nice soft touch feel and also includes a feature to short the motor when released to minimize coasting. This should help prevent getting the flaps and trim confused.

I had a nice flange bent on the bottom of this panel at work on a pressbrake. Too bad that after a few days a crack developed all along the radius. I just took some seaming pliers to it and it broke right off. So I decided to just rivet on a piece of angle at the bottom:

Image

Here is the goal for this panel:

Image

And here it is to date, just need to spend about $16K to fill her up!:

Image

Ain't them Stein Vents Purdy?
Brantel (Brian Chesteen),
RV12-IS, #121606, N912BC - Building Now!
RV10, #41942, N????? - Project Sold
RV-7/TU, #72823, N159SB - SOLD

Spike
Chief Rivet Banger
Posts: 4013
Joined: Thu Oct 14, 2004 8:40 pm
Location: Baltimore, MD
Contact:

Post by Spike »

niiiice.
http://www.rivetbangers.com - Now integrating web and mail!
Current Build: 2 years into a beautiful little girl

airguy
Class E
Posts: 125
Joined: Tue Feb 12, 2008 5:41 pm
Contact:

Post by airguy »

Your panel looks remarkably like what I had built in my head for mine, with the possible exception of a 430W in place of the 496, if I can find a used one at a decent price when the time comes.

Ok - enough drooling - I'm back to the shop making metal chips....
Greg Niehues
Midland, TX
RV9A - finishing - 90% done, 90% to go
http://websites.expercraft.com/airguy/
Building a 9A with too much fuel and too much engine - should drop dead any minute now. :roll:

User avatar
RVNewsletter
Class D
Posts: 259
Joined: Wed Mar 29, 2006 9:57 am
Location: St. Paul, MN.
Contact:

Post by RVNewsletter »

Is that a non-stock panel? I ask because on mine the vents are only minimally attached to the panel itself.
Bob Collins
Letters from Flyover Country
http://rvnewsletter.blogspot.com/

Spike
Chief Rivet Banger
Posts: 4013
Joined: Thu Oct 14, 2004 8:40 pm
Location: Baltimore, MD
Contact:

Post by Spike »

It sounded like he had another one made and extended it on the bottom to make some more room.

John
http://www.rivetbangers.com - Now integrating web and mail!
Current Build: 2 years into a beautiful little girl

User avatar
Wicked Stick
Class B
Posts: 1000
Joined: Wed Feb 09, 2005 10:00 pm
Location: KEWB

Post by Wicked Stick »

I would think this also means a shorter stick and greater stick forces. :(
Dave "WS" Rogers
RV-8 (125 hrs & counting)
N173DR

Spike
Chief Rivet Banger
Posts: 4013
Joined: Thu Oct 14, 2004 8:40 pm
Location: Baltimore, MD
Contact:

Post by Spike »

Yeah, but its not like the stick forces in an RV are high to begin with. Actually, when flying the ones I have flown, I never held the stick within the top 1.5" of the stick anyway. Though I guess that is personal preference. :mrgreen:
http://www.rivetbangers.com - Now integrating web and mail!
Current Build: 2 years into a beautiful little girl

User avatar
Brantel
Class B
Posts: 1030
Joined: Wed Aug 30, 2006 3:23 pm
Location: Newport, TN

Post by Brantel »

Loaded the table up with new parts... About $6700 worth :o

Got the remaing firewall forward items that I needed, tons of wire, connectors, terminals, fuse blocks, ground blocks, dimmers, switches, control cables, alternator, exhaust, muffs, Dynon sensor kit, Dynon wiring harnesses, alt enc converter, lights, intercom, pitot, ELT, Primer Kit, and a bunch more misc. stuff.

All I have left to purchase is the two Dynon screens, AP74, A210 com radio and the Prop.

Image
Brantel (Brian Chesteen),
RV12-IS, #121606, N912BC - Building Now!
RV10, #41942, N????? - Project Sold
RV-7/TU, #72823, N159SB - SOLD

User avatar
smittysrv
Class D
Posts: 287
Joined: Sat Sep 03, 2005 7:10 am
Contact:

Post by smittysrv »

You're a brave man. My wife would have 2 cows if I put aviatin' stuff on the dining room table!

User avatar
cjensen
Whiskey Victor
Posts: 5275
Joined: Sat Apr 23, 2005 10:36 pm
Location: Green Bay, WI

Post by cjensen »

Sweet Brian!! That's the best use for a dining room table if you ask me... :wink:

8) 8)
Chad Jensen
Missing my RV-7...
Vertical Power support
920.216.3699
http://verticalpower.com

Post Reply