After riveting my flaps together I noticed that the top skin has a very slight raised lip as it attaches to the front spar. Is this a common thing or did I do something wrong when building it. I will try to post a pic after I import them. I still have to get used to posting pics.
Thanks,
Mike Balzer
[img]http://www.rivetbangers.com//forumsGall ... mber=2[img][/img]
FLAP SKI JUMP
-
Mike Balzer

- Class E
- Posts: 147
- Joined: Tue May 20, 2008 11:18 pm
- Location: Saugus, CA
FLAP SKI JUMP
It is better to be on the ground wishing you were in the air, then being in the air and wishing you were on the ground. N78MB


Do you mean something like this ? This is after a lot of work trying to get rid of the bend aft of the spar rivet line. To my way of thinking the curve in the top skin should start just forward of the spar rivet line.
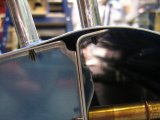
One of mine the start of the bend was way aft of the rivet line, the other was at the rivet line. I tried taking the bend out of the really bad one, gave up, and got a replacement skin. The one with the bend starting at the rivet line came out ok once the rivets were put in, clecos could not hold it flat to the spar before that though.

One of mine the start of the bend was way aft of the rivet line, the other was at the rivet line. I tried taking the bend out of the really bad one, gave up, and got a replacement skin. The one with the bend starting at the rivet line came out ok once the rivets were put in, clecos could not hold it flat to the spar before that though.
Don Sinclair
CYKF
RV-7A (Fuselage)
CYKF
RV-7A (Fuselage)
-
Mike Balzer
- Class E
- Posts: 147
- Joined: Tue May 20, 2008 11:18 pm
- Location: Saugus, CA
Thanks for the reply,
Your pic shows what happened to mine. Did Vans give you a new skin? or did you have to pay for it? Unifortunatly I riveted mine all together and noticed it after. I wonder if Vans would give me the parts to rebuild my entire left flap even though I would hate to do so with the work I put into it?
Mike Balzer
Last edited by Mike Balzer on Mon Jan 25, 2010 1:53 pm, edited 2 times in total.
It is better to be on the ground wishing you were in the air, then being in the air and wishing you were on the ground. N78MB
-
Mike Balzer
- Class E
- Posts: 147
- Joined: Tue May 20, 2008 11:18 pm
- Location: Saugus, CA
YesMike Balzer wrote:Did Vans give you a new skin?
Yesor did you have to pay for it?
It is actually a long story, I ended up with two replacements, the first one was even worse than the original skin, the second one was fine. With all the issues of importation, customs, brokerage fees, I ended up paying quite a bit by the time it was all over, but Vans did not charge me for at least the second skin (I don't remember about the first one), or even the shipping on the second one. I did have pictures of before and after to document the whole thing as well as to compare it to a properly bent one.
I certainly would have been hard pressed to make much of case for even a replacement skin if I hadn't taken all the before and after pictures, I doubt they would spring for a whole flap, but that's just my opinion.
If you do decide to drill out all the rivets, get a new skin, and rebuild it, I would suggest requesting that whoever picks the new skin to make sure the forward bend doesn't start aft of the spar rivet line. It seems a number of builders have decided to leave well enough alone, or haven't even taken notice, it all depends on how bad it turned out and how picky the builder is with the result.
A couple of other local builders (not building RV's) suggested just filling in the dip prior to painting, others just shook their head and said that it would be normal for their metal kit.
Don Sinclair
CYKF
RV-7A (Fuselage)
CYKF
RV-7A (Fuselage)
-
Mike Balzer
- Class E
- Posts: 147
- Joined: Tue May 20, 2008 11:18 pm
- Location: Saugus, CA
Thanks so much for your input Don,
My flap turned out very nice besides the ski jump. If the Right Flap is the same I may just leave well enough alone and keep building.
If I find I cant get them to line up correctly or it effects the way the aircraft flies I may build new ones.
have a great week,
Mike Balzer
My flap turned out very nice besides the ski jump. If the Right Flap is the same I may just leave well enough alone and keep building.
If I find I cant get them to line up correctly or it effects the way the aircraft flies I may build new ones.
have a great week,
Mike Balzer
It is better to be on the ground wishing you were in the air, then being in the air and wishing you were on the ground. N78MB
-
Cherokee Driver

- Class E
- Posts: 144
- Joined: Sun Sep 18, 2005 10:43 am
- Location: Waukesha, Wisconsin
- Contact:
This is the great thing about this website! I was just about to start riveting the top skin to my flaps when I opened this thread. It made me stop to check out my skin.
In my case the flap skin looks to be a lot more builder friendly. This goes to show the differences in how the parts are made.

For those that are in the other camp, with bends beginning aft of the rivet line, I wonder if the wing nut type clecos would have the strength to pull the skin flat????

I don't need that much in my application but I may use them any way to pull it nice and tight.
CD
In my case the flap skin looks to be a lot more builder friendly. This goes to show the differences in how the parts are made.
For those that are in the other camp, with bends beginning aft of the rivet line, I wonder if the wing nut type clecos would have the strength to pull the skin flat????
I don't need that much in my application but I may use them any way to pull it nice and tight.
CD
RV-8A
Wing Kit (Slow Build...very slow build)
Home of "Skunk Works, Wisconsin Branch"
"Glacial Pace...but lovin every minute of it!"
Wing Kit (Slow Build...very slow build)
Home of "Skunk Works, Wisconsin Branch"
"Glacial Pace...but lovin every minute of it!"
-
Spike
- Chief Rivet Banger
- Posts: 4013
- Joined: Thu Oct 14, 2004 8:40 pm
- Location: Baltimore, MD
- Contact:
I have always wondered how well those things work. I kind of wish I had gotten some at the beginning of the build.
Spike
Spike
http://www.rivetbangers.com - Now integrating web and mail!
Current Build: 2 years into a beautiful little girl
Current Build: 2 years into a beautiful little girl

Using the wingnut clecos won't solve the problem Mike had. In the end, the spar is made out of thicker material and will bend the skin to form the "ski jump". The only solution is to adjust the bend on the flange of the spar to match up with the skin.Cherokee Driver wrote: For those that are in the other camp, with bends beginning aft of the rivet line, I wonder if the wing nut type clecos would have the strength to pull the skin flat????
Mike Bullock
http://www.rvplane.com
RV-7 | Superior IO-360 | Whirlwind 200RV
Garmin GTN650 | GRT Dual Sport SX EFIS
Status: FLYING!
http://www.rvplane.com
RV-7 | Superior IO-360 | Whirlwind 200RV
Garmin GTN650 | GRT Dual Sport SX EFIS
Status: FLYING!
-
TomNativeNewYorker

- Class D
- Posts: 439
- Joined: Tue Mar 21, 2006 9:19 pm
- Location: KSAV
wingnut clecos may get you what you need or possibly not. one thing though is that if you crank down on the nuts too hard and the material is pretty thin (which it appears so in the pic) they may have the tendency to stretch the hole a bit and the wing nut cleco to pul through the enlarged hole.
nice thick 3/32" diameter washers on the back side usually helps from having them pull through the hole and blowing it out.
If you already have the wing clecos, try them out and see what it looks like, but if you dont have them, it could be an expensive deal buying them at over 2 bucks a pop new.
I use them a lot on repairs on aging aircraft, so I made the investment on a small collection of different sizes except 3/32" because they arent common in my line of work.
e-bay is usually a pretty good source of clecos (wing and button type), you just have to know the prices and dont overbid. people pay more for clecos on ebay than if they would have bought them from any of the aircraft tool stores online such as yardstore.com and browntool.com
YMMV
I tried the wingnut clecos before giving up, mine was really bad at the beginning as I said, didn't do the trick.
I use a 6-32 nut on the back side of the wingnut cleco or a washer and nut sometimes, it is not that difficult to pull right through otherwise if using a wrench. I've only used them in few places where I just didn't want to take things apart again. They were handy, but like most really special tools, there are other ways to get the job done.
Yours looks perfect CD.
Don Sinclair
CYKF
RV-7A (Fuselage)
CYKF
RV-7A (Fuselage)
-
Mike Balzer
- Class E
- Posts: 147
- Joined: Tue May 20, 2008 11:18 pm
- Location: Saugus, CA
Toms right,
wing nut or draw clecos are primarly made for thicker materials, I used them alot in the airlines when you put a special sealant between the parts you are riveting to make sure the part you are riveting stays firmly seated before the sealant cures. The sealant was 1436 corrosion inhibiting sealant used in certain areas of a jumbo jet.
Mike Balzer
It is better to be on the ground wishing you were in the air, then being in the air and wishing you were on the ground. N78MB
-
Bob Barrett
- Class C
- Posts: 625
- Joined: Sat Nov 13, 2004 8:37 pm
- Location: Sartell MN
If there is a small difference in the flaps you can most likely, adjust for this in the flank linkage. I have electric flaps but I think the flap linkages are all pretty much the same. Maybe they have a different linkage for the RV-10 but my guess is the others are all the same and probably interchangeable. Try to keep any differences to minimum.